Customization Guide
Make Starfort your own game: new turrets, new enemies, a new mascot, your own sounds, texts and colors, and an easier or harder campaign. Every recipe is a short list of steps and names the exact file to open. You do not need to know how to program. All pictures on this page are real screenshots of the game in this package.
1. Before you start: tools, backup and testing
Free tools that are enough for everything on this page:
- Text editor: Visual Studio Code (Windows, macOS, Linux) or Notepad++ (Windows). Never use Word or WordPad: they break code files.
- Pictures: Photopea (free, in the browser, opens and exports WebP and PNG), GIMP or Krita. To convert a PNG to WebP: Squoosh (choose "WebP", quality 80 to 90).
- Sounds: Audacity (cut, change volume, export MP3).
Make a backup first. Copy the whole source/ folder to source-backup/.
If a change goes wrong, copy the original file back.
Which folder to edit: make your changes in source/. The game/ folder
is the ready-to-upload copy of the same files. You can also edit game/ directly if you never plan
to use the tools; the file names inside are the same.
See your change on your computer. The game needs a small local web server (opening
index.html with a double click does not work, the browser blocks the modules). Pick one:
-
With Node.js 26.13 or newer: open a terminal in
source/and runnpm cionce, thennpm run serve, and openhttp://localhost:5191/. -
With Visual Studio Code: install the free "Live Server" extension, open the
source/folder and click "Go Live". -
With Python installed: run
python -m http.server 8000insidesource/and openhttp://localhost:8000/.
Ctrl+F5
on Windows, Cmd+Shift+R on macOS).
2. Screenshot gallery
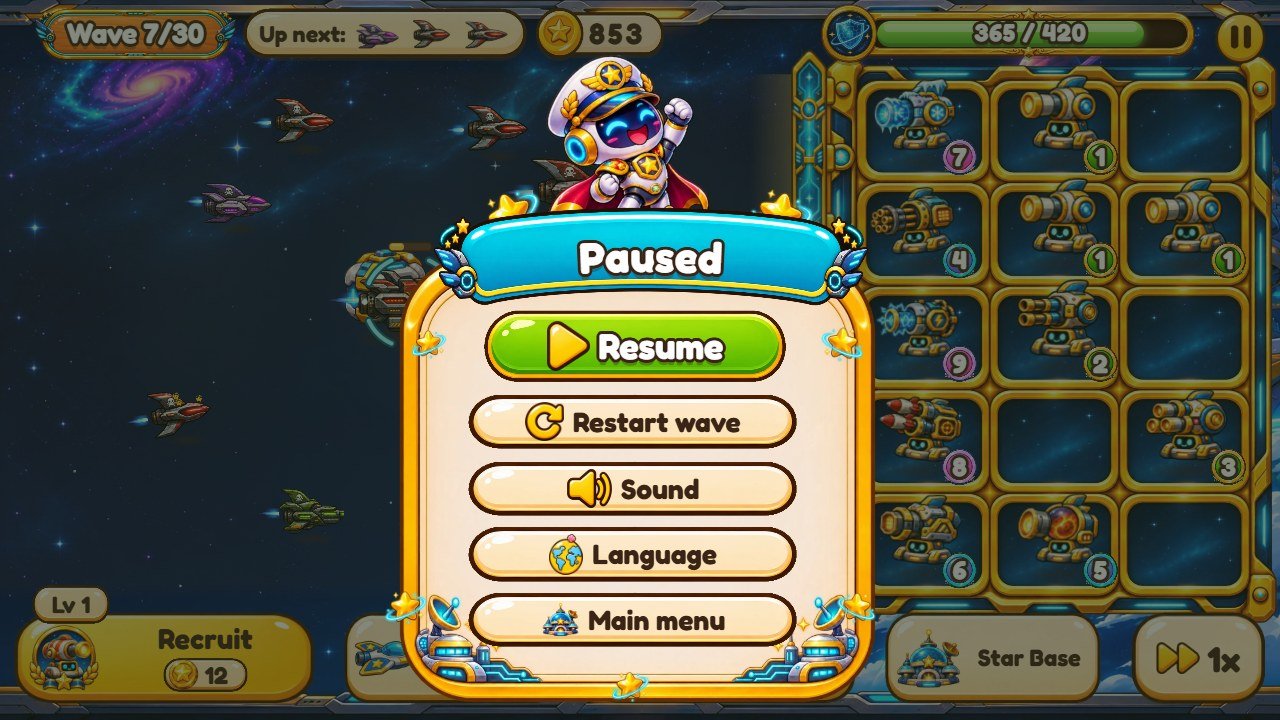
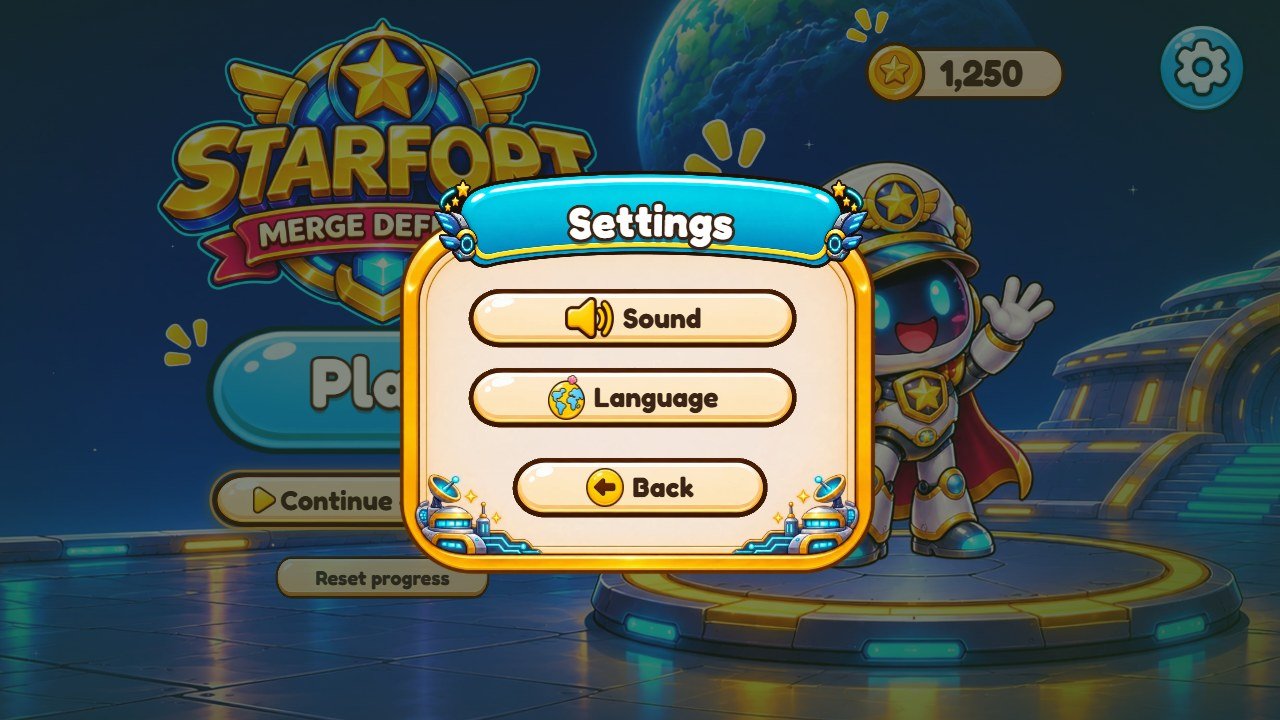
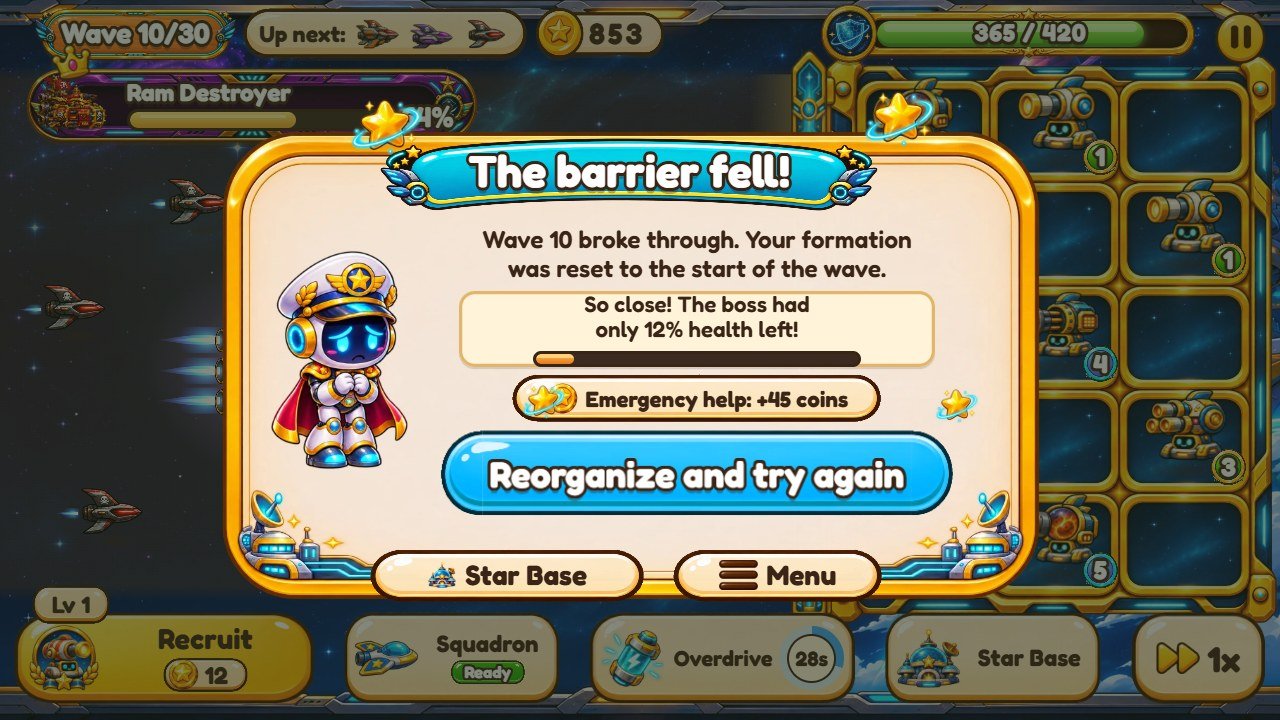
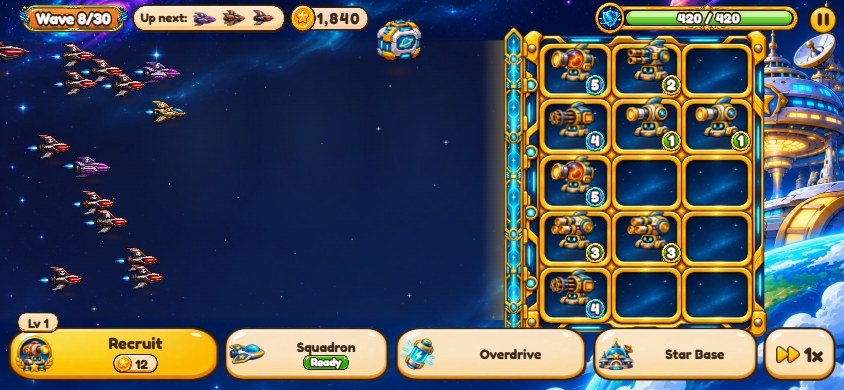
Every screen of the game, captured from this package. Click a picture to open it full size.
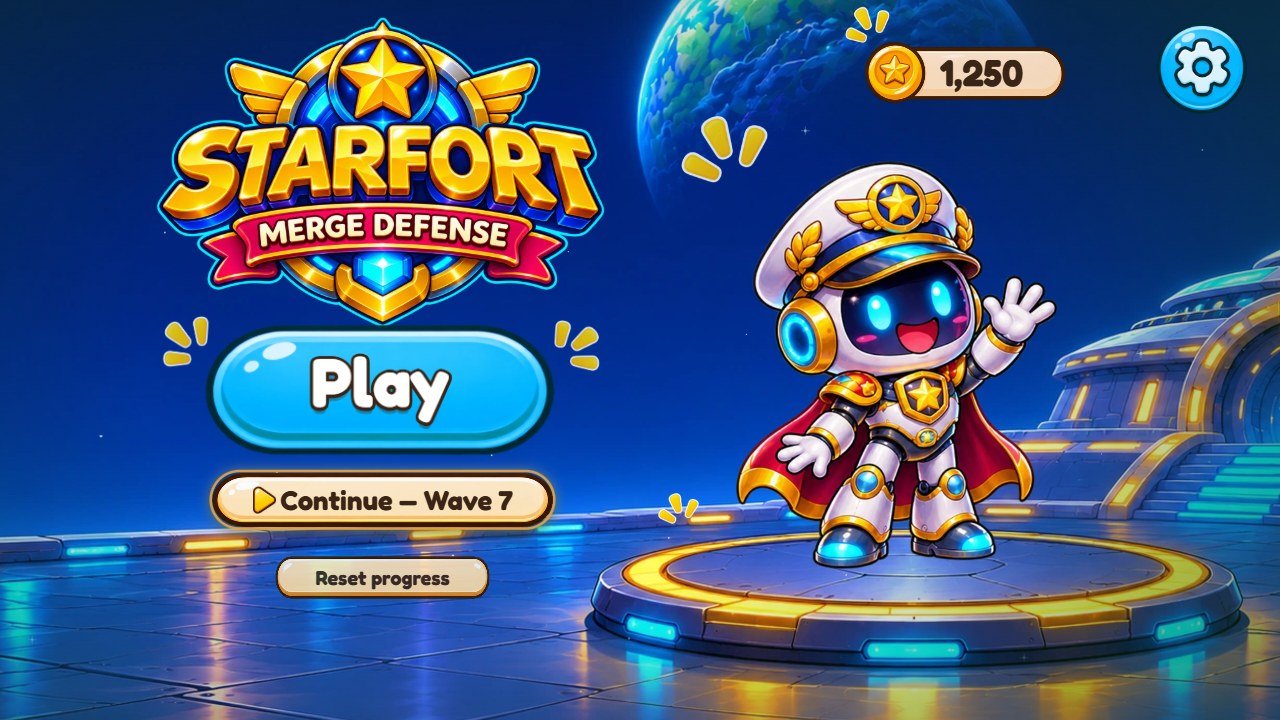
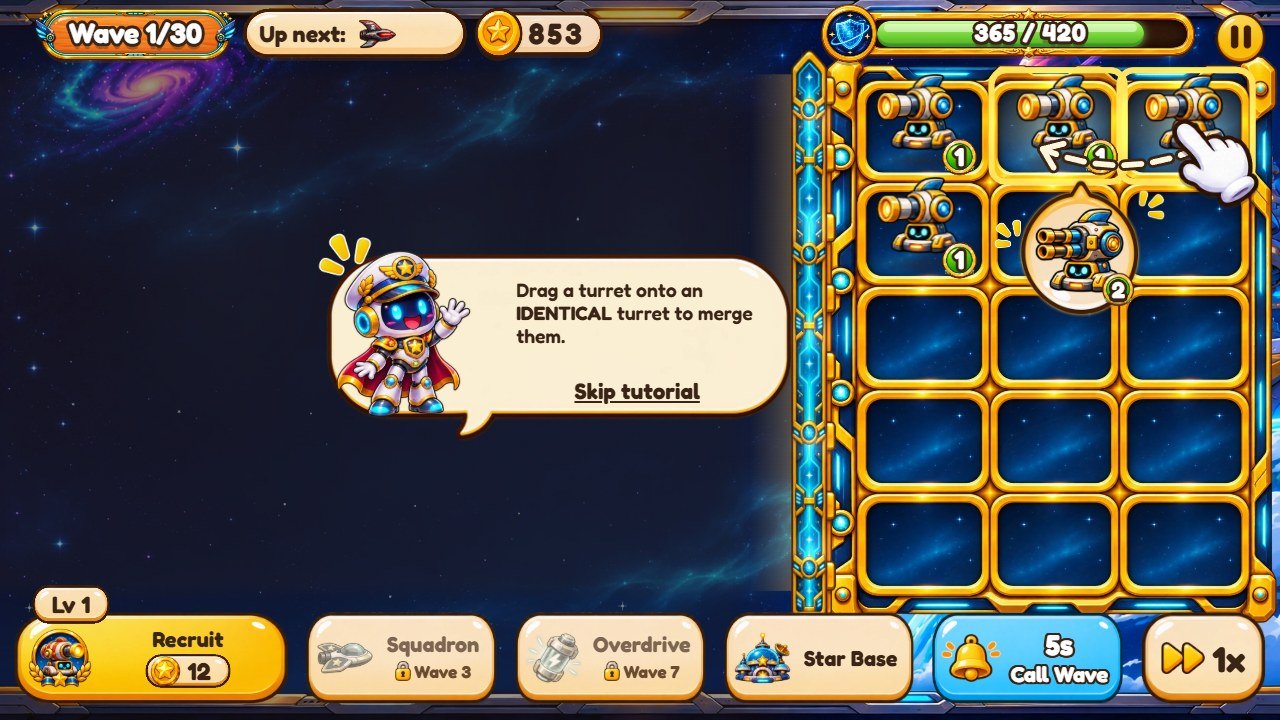
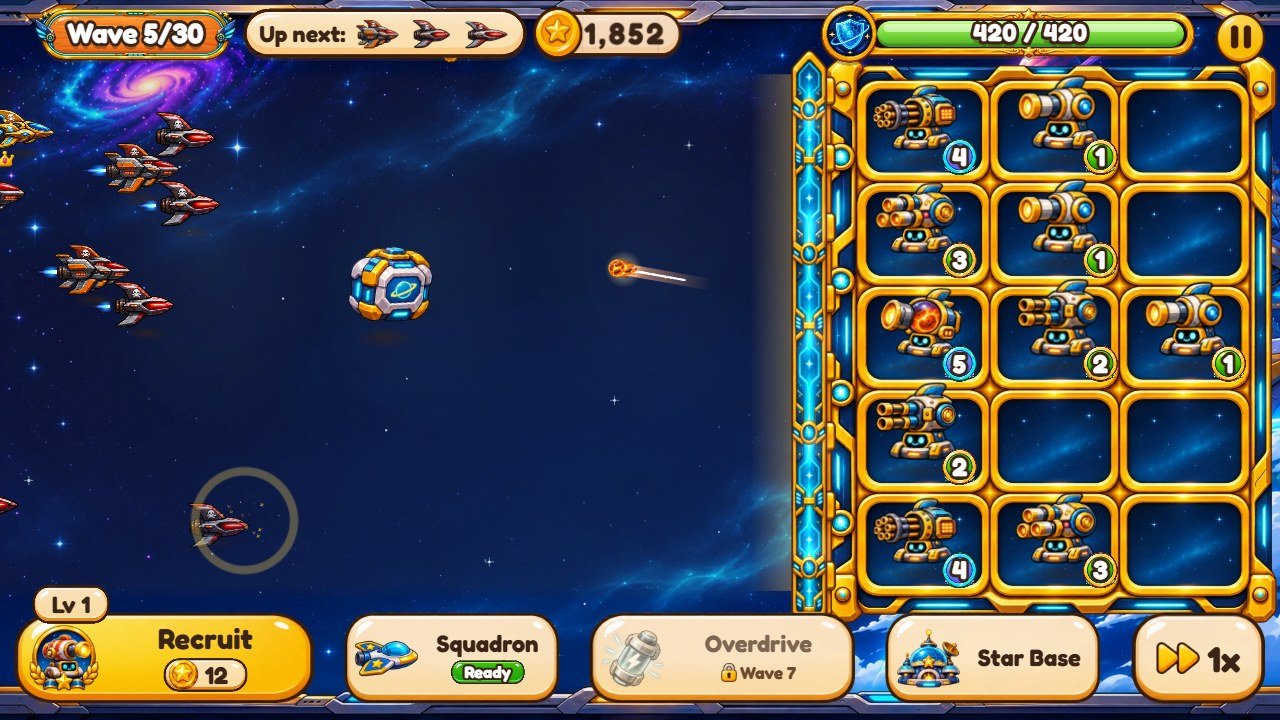
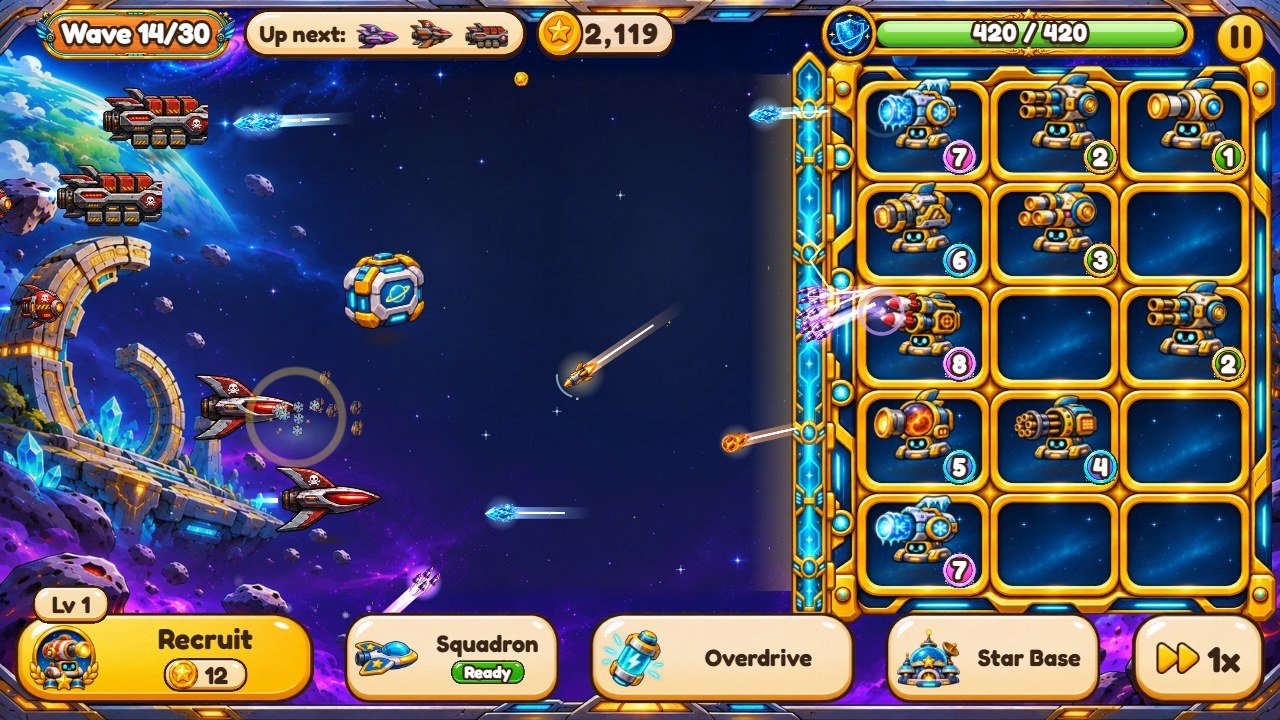
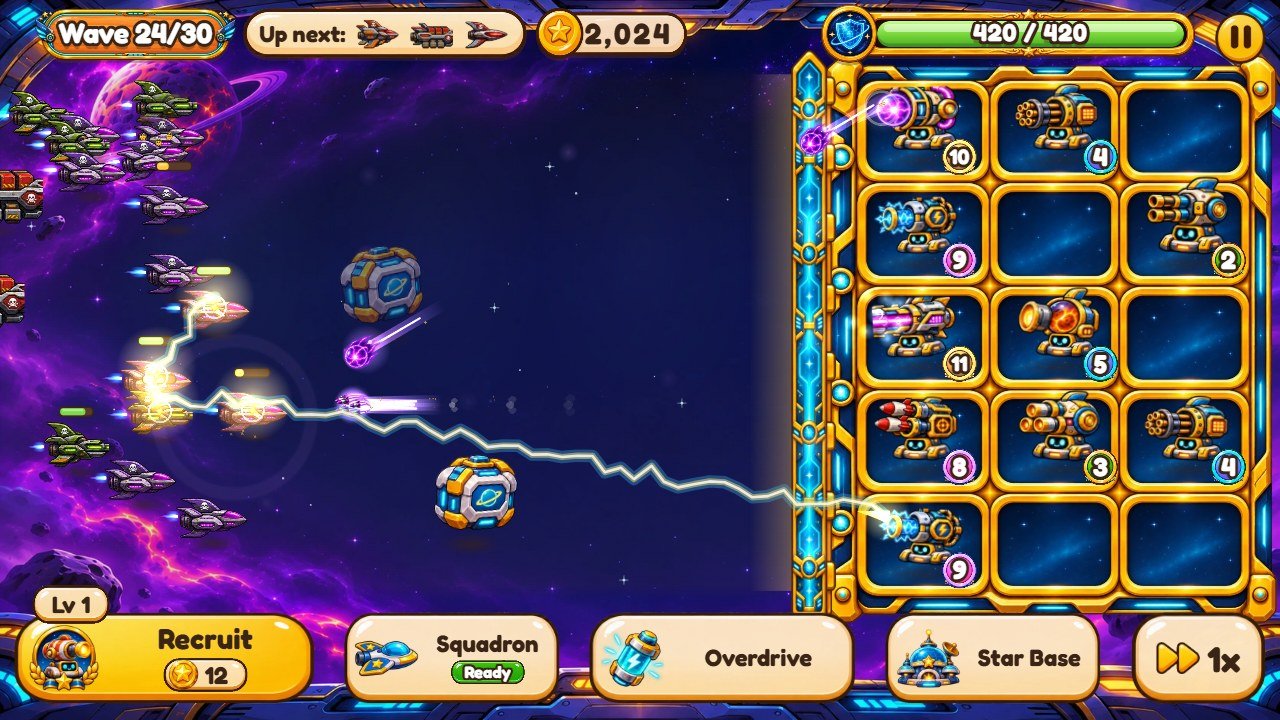
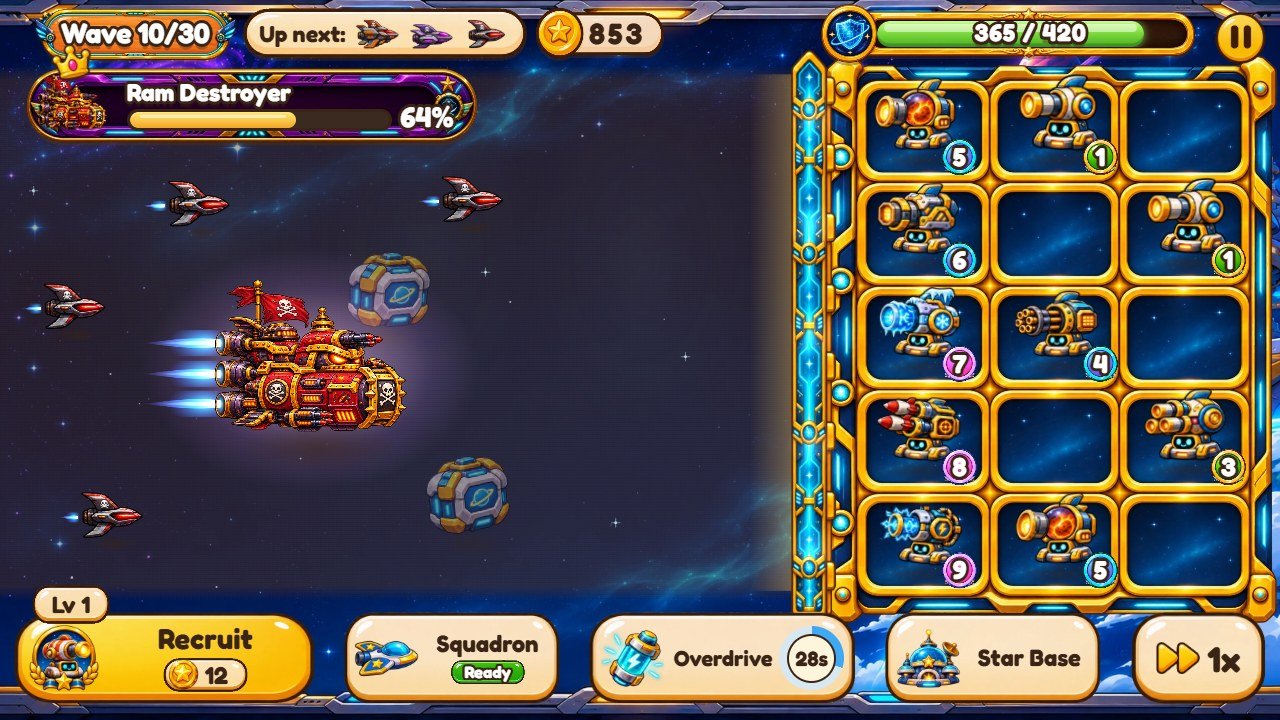
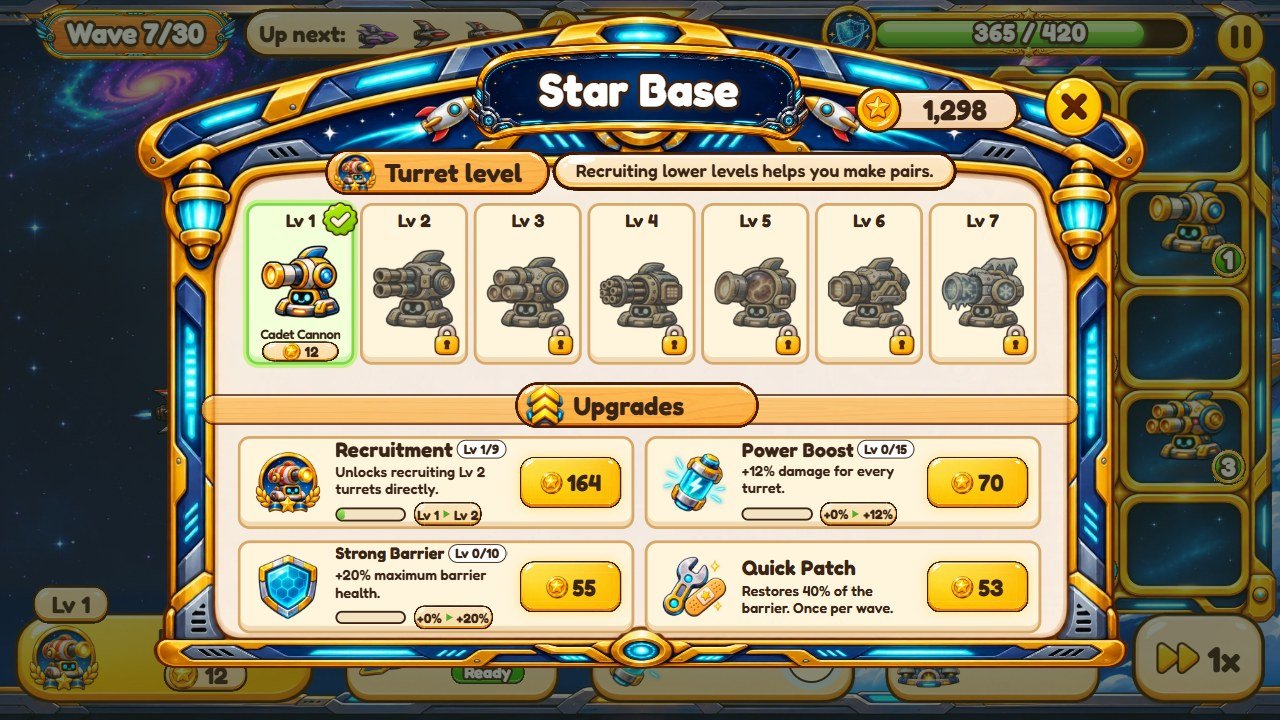
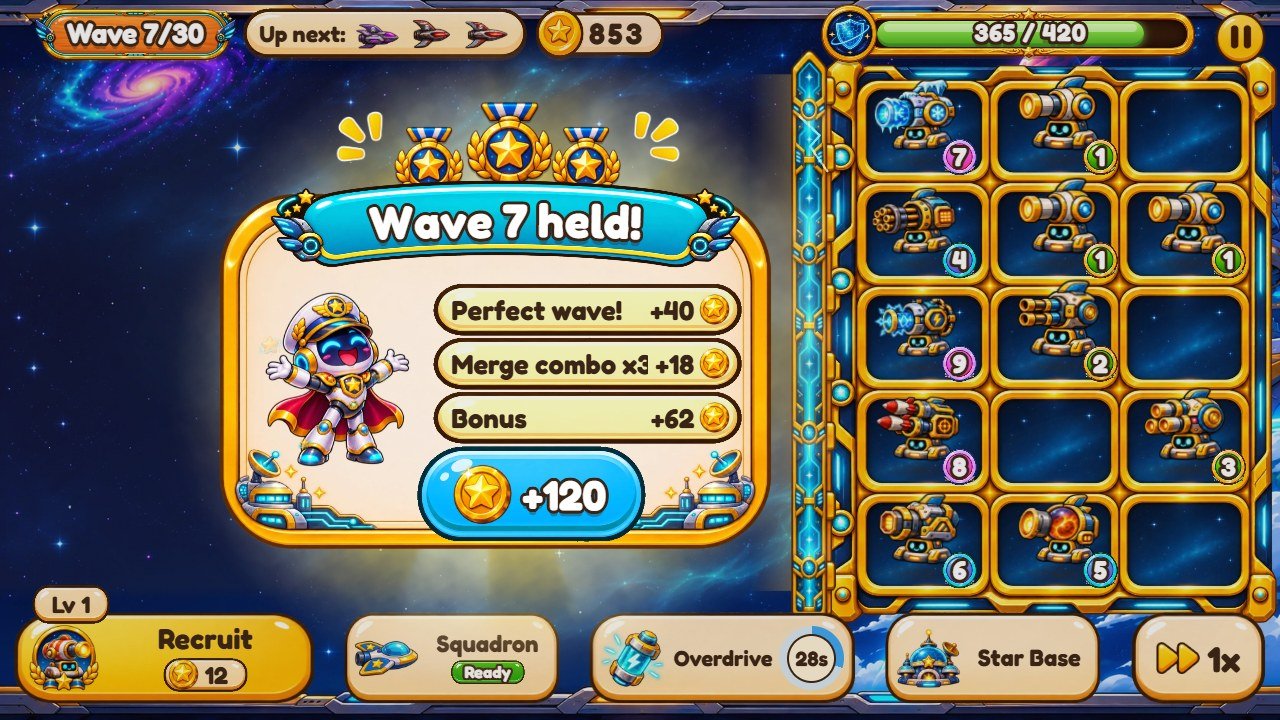
3. Where everything is
The numbers on each screenshot match the table below it, which names the file to change.
Title screen
1
2
3
4
| # | What you see | File to change |
|---|---|---|
| 1 | Play button |
Text: key play in src/i18n/en.js (and the other language files). Button picture:
assets/ui/btn-play.webp.
|
| 2 | Continue button |
Shows the saved wave and coins. Picture: assets/ui/btn-medal.webp and
assets/ui/ic2-play.webp.
|
| 3 | Settings button | Gear picture: assets/ui/btn-gear.webp. |
| 4 | Reset progress |
Text: key resetProgress in src/i18n/. It asks for a second tap before erasing.
|
Battle screen
1
2
3
4
5
6
7
8
9
10
| # | What you see | File to change |
|---|---|---|
| 1 | Wave counter |
Plate: assets/ui/wave-plate.webp. Text: keys wave and
waveEndless in src/i18n/. Number of waves: TOTAL_WAVES in
src/game/data.js.
|
| 2 | Enemies coming next |
Pill: assets/ui/upnext-pill.webp. The small enemy icons come from the enemy pictures in
assets/pests/.
|
| 3 | Coins |
Pill: assets/ui/coin-pill.webp. Coin icon: assets/ui/ic-coin.webp. Rewards:
recipe J.
|
| 4 | Barrier health |
Frame: assets/ui/hp-frame.webp. Health: BAL.fence.hp in
src/game/data.js (recipe I).
|
| 5 | Pause button | Picture: assets/ui/pause.webp. |
| 6 | Recruit button |
Icon: assets/ui/ic-packet.webp. Text: plant in
src/i18n/starfort-theme.js. Price: recipe J.
|
| 7 | Squadron power |
Icon: assets/ui/ic-bee.webp. Name: bees in starfort-theme.js.
Cooldown and strength: BAL.bees in data.js.
|
| 8 | Overdrive power |
Icon: assets/ui/ic-sack.webp. Name: fertilizer in
starfort-theme.js. Timing: BAL.fertilizer in data.js.
|
| 9 | Star Base button |
Icon: assets/ui/ic-shed.webp. Name: shed in starfort-theme.js.
Upgrade prices: recipe J.
|
| 10 | Game speed 1x / 2x | Icon: assets/ui/ic-fast.webp. |
Boss wave
1
| # | What you see | File to change |
|---|---|---|
| 1 | Boss health bar |
Strip: assets/ui/boss-strip.webp, crown: assets/fx/crown.webp. Boss names:
boss_rhino, boss_wasp, boss_megasnail in
starfort-theme.js.
|
4. Recipe A: replace any picture
-
Find the picture in
assets/(the tables on this page give the exact file).assets/ui/holds buttons, icons and panels;assets/env/the backgrounds;assets/plants/the turrets;assets/pests/the enemy ships;assets/fx/small effects. - Open it in Photopea to see its exact size in pixels (Image > Image Size).
- Make your new picture with the same width and height and a transparent background where the original has one.
- Export it as WebP (Photopea: File > Export as > WEBP) or as PNG and convert it with Squoosh.
- Save it with exactly the same file name over the old one (keep the backup). Reload the page.
5. Recipe B: logo, game name, icon and page title
-
Logo (title screen, loading screen and "rotate your phone" screen):
assets/ui/logo.webp, 1536 x 1024 pixels with a transparent background. -
Browser tab icon:
assets/ui/favicon-starfort.png, 400 x 400 pixels. Keep the name, or change the name inindex.html(line withrel="icon"). -
Page title (the text on the browser tab): the
<title>line inindex.html. -
Game name inside the game: key
titleinsrc/i18n/starfort-theme.js. The file has one block per language (en:,pt:,es:...); change it in each block you use. -
Save name: if you publish a renamed game on the same website as Starfort, change
SAVEandSETTINGSat the top ofsrc/main.js(for examplemygame.save.v1) so the two games keep separate progress.
6. Recipe C: the robot captain (mascot)
The captain appears on the title screen, in the tutorial and on the victory and defeat cards. Each pose is one
picture of 650 x 650 pixels with a transparent background, in assets/ui/:
| File | Where it appears |
|---|---|
hazel-wave.webp |
Title screen (waving) |
hazel-sit.webp |
Pause menu |
hazel-cheer.webp |
Wave held and campaign victory |
hazel-worried.webp |
The barrier fell |
tut-bust.webp |
Tutorial speech (head and shoulders) |
tut-hand.webp |
Tutorial pointing hand |
Replace all poses in the same art style (recipe A). The names start with hazel- because the game
engine is shared with other themes; the name does not matter to the player.
7. Recipe D: turrets (pictures, names, power)
-
Pictures: each of the 12 levels has four pictures of 300 x 300 pixels in
assets/plants/:pN-0.webpresting,pN-1.webpblinking or happy,pN-2.webpaiming,pN-3.webpfiring (Nis the level, 1 to 12). Draw the turret centered, facing left, on a transparent background, and keep the four frames aligned. -
Names: keys
p1top12insrc/i18n/starfort-theme.js(English: Cadet Cannon, Twin Blaster, Burst Cannon, Turbo Gatling, Meteor Cannon, Solar Piercer, Cryo Guardian, Guided Swarm, Electric Arc, Plasma Orb, Lance Star, Vortex Core). -
Power: the list
PLANTSat the top ofsrc/game/data.js, one line per level:dmg= damage per hit,rate= shots per second,range= how far it shoots. Change one number at a time, for exampledmg: 10todmg: 12makes level 1 hit 20% harder. Do not changelv,keyorfire.
8. Recipe E: enemy ships and bosses
-
Pictures: each enemy is one strip of 8 frames in
assets/pests/, 3360 x 330 pixels (8 cells of 420 x 330). Cell order: four flying frames, two attack frames, one "hit" frame and one "destroyed" frame. The ship flies to the right, toward the barrier. Keep the cell size; the list of frames is inassets/pests/pests.json. -
Files:
aphid.webp,hopper.webp,beetle.webp,snail.webp(withsnail_cracked.webpafter its shield breaks),slug.webp,stinkbug.webp,bombardier.webp,ladybug.webp(the rare golden bonus ship). Bosses:rhino.webp,wasp.webp,megasnail.webpplus a large picture each (rhino-space-hd.png,wasp-space-hd.png,megasnail-space-hd.png, 1680 x 1320). -
Boss names:
boss_rhino,boss_wasp,boss_megasnailand their one-line descriptionsbossEpi_...insrc/i18n/starfort-theme.js. -
Strength: the list
PESTSinsrc/game/data.js:hp= health,speed= how fast it flies,dmg= damage to the barrier,reward= coins when destroyed.
9. Recipe F: backgrounds and world names
| File (assets/env/) | Size | What it is |
|---|---|---|
bg1.webp, bg2.webp, bg3.webp |
1672 x 941 | Battle background of worlds 1, 2 and 3 (waves 1-10, 11-20, 21-30) |
fg1.webp, fg2.webp, fg3.webp |
1597 x 260 | Front strip drawn over the bottom of each world |
ext1.webp ... ext3.webp, extl1.webp ... extl3.webp
|
as the files | Side extensions shown on very wide screens |
title.webp, ext-title-l.webp, ext-title-r.webp |
1671 x 941 | Title screen background and its side extensions |
fence.webp |
121 x 1252 | The star base barrier (vertical) |
planter.webp |
852 x 1100 | The turret dock with the grid of slots |
margin-top*.webp, margin-bottom*.webp |
as the files | Decorative edges above and below the field |
World names: keys world0, world1, world2 in
src/i18n/starfort-theme.js.
planter.webp, keep the slots in the same places: the game measures them in
PLANTER at the top of src/render/scene-art.js.
10. Recipe G: texts and translations
-
Theme words (game name, turret, enemy, boss, world and power names, tutorial lines) are in
src/i18n/starfort-theme.js, one block per language. These win over everything else. -
Interface texts (buttons, menus, cards) are in
src/i18n/en.js,pt.js,es.jsand the other 11 language files. -
Open the file, search the text you see in the game (
Ctrl+F), change only what is between the quotes, save. - Keep markers such as
{n}exactly as they are: the game replaces them with numbers. -
A quote inside a text needs a backslash:
'It\'s here'. If the game stops loading after an edit, a quote is missing; restore the backup or check the line in Visual Studio Code, which shows the error in red. - Missing texts fall back to English, so you can translate only some keys.
11. Recipe H: sounds and music
Sound effects are MP3 files in assets/sfx/espaco/. Each sound has two recorded variations (-1
and -2) that the game alternates. Replace both files, keeping the names. Keep sounds short (under
one second for shots and hits) and normalize them in Audacity (Effect > Normalize) so the volume matches.
| Sound | Files | When it plays |
|---|---|---|
click |
assets/sfx/espaco/click-1.mp3assets/sfx/espaco/click-2.mp3 |
any button |
open |
assets/sfx/espaco/open-1.mp3assets/sfx/espaco/open-2.mp3 |
a window opens |
buy |
assets/sfx/espaco/buy-1.mp3assets/sfx/espaco/buy-2.mp3 |
a turret is recruited |
drop |
assets/sfx/espaco/drop-1.mp3assets/sfx/espaco/drop-2.mp3 |
a turret is placed |
merge |
assets/sfx/espaco/merge-1.mp3assets/sfx/espaco/merge-2.mp3 |
two turrets merge |
mergeBig |
assets/sfx/espaco/mergeBig-1.mp3assets/sfx/espaco/mergeBig-2.mp3 |
a high-level merge |
shot |
assets/sfx/espaco/shot-1.mp3assets/sfx/espaco/shot-2.mp3 |
levels 1-3 fire |
shotRapid |
assets/sfx/espaco/shotRapid-1.mp3assets/sfx/espaco/shotRapid-2.mp3
|
the Turbo Gatling fires |
shotCannon |
assets/sfx/espaco/shotCannon-1.mp3assets/sfx/espaco/shotCannon-2.mp3
|
heavy cannons fire |
shotPlasma |
assets/sfx/espaco/shotPlasma-1.mp3assets/sfx/espaco/shotPlasma-2.mp3
|
plasma turrets fire |
lob |
assets/sfx/espaco/lob-1.mp3assets/sfx/espaco/lob-2.mp3 |
the Meteor Cannon launches |
zap |
assets/sfx/espaco/zap-1.mp3assets/sfx/espaco/zap-2.mp3 |
the Electric Arc |
laserBeam |
assets/sfx/espaco/laserBeam-1.mp3assets/sfx/espaco/laserBeam-2.mp3
|
beam turrets |
hit |
assets/sfx/espaco/hit-1.mp3assets/sfx/espaco/hit-2.mp3 |
a shot hits a ship |
pop |
assets/sfx/espaco/pop-1.mp3assets/sfx/espaco/pop-2.mp3 |
a ship is destroyed |
popBoss |
assets/sfx/espaco/popBoss-1.mp3assets/sfx/espaco/popBoss-2.mp3 |
a boss is destroyed |
coin |
assets/sfx/espaco/coin-1.mp3assets/sfx/espaco/coin-2.mp3 |
coins arrive |
coinBig |
assets/sfx/espaco/coinBig-1.mp3assets/sfx/espaco/coinBig-2.mp3 |
a big reward |
fence |
assets/sfx/espaco/fence-1.mp3assets/sfx/espaco/fence-2.mp3 |
a ship hits the barrier |
fenceHeavy |
assets/sfx/espaco/fenceHeavy-1.mp3assets/sfx/espaco/fenceHeavy-2.mp3
|
a heavy hit on the barrier |
crack |
assets/sfx/espaco/crack-1.mp3assets/sfx/espaco/crack-2.mp3 |
armor cracks |
waveStart |
assets/sfx/espaco/waveStart-1.mp3assets/sfx/espaco/waveStart-2.mp3
|
a wave starts |
waveWin |
assets/sfx/espaco/waveWin-1.mp3assets/sfx/espaco/waveWin-2.mp3 |
a wave is held |
lose |
assets/sfx/espaco/lose-1.mp3assets/sfx/espaco/lose-2.mp3 |
the barrier falls |
boss |
assets/sfx/espaco/boss-1.mp3assets/sfx/espaco/boss-2.mp3 |
a boss arrives |
bees |
assets/sfx/espaco/bees-1.mp3assets/sfx/espaco/bees-2.mp3 |
the Squadron power |
fertilizer |
assets/sfx/espaco/fertilizer-1.mp3assets/sfx/espaco/fertilizer-2.mp3
|
the Overdrive power |
packet |
assets/sfx/espaco/packet-1.mp3assets/sfx/espaco/packet-2.mp3 |
a supply pod |
Music is in assets/music/: starfort-menu.mp3 (title screen),
starfort-onda.mp3 (battles) and starfort-chefe.mp3 (boss waves). Replace them with
loops of the same names. The list of variations is in src/sfx-selecao.js; volumes per sound are in
LEVEL in src/audio.js.
12. Recipe I: difficulty and waves
All numbers are in src/game/data.js, in the block BAL and the list WAVES.
Change a little at a time and play a few waves.
| Setting | Default | Easier | Harder |
|---|---|---|---|
startCoins (coins at the start) |
45 | 80 | 30 |
hpGrowth (enemy health growth per wave) |
1.405 | 1.33 | 1.45 |
fence: { hp: 420 } (barrier health) |
420 | 600 | 320 |
prep (seconds before a wave) |
5 | 8 | 3 |
bees.cooldown (Squadron recharge, seconds) |
16 | 12 | 22 |
Waves: each entry of WAVES is one wave. A group reads
['aphid', 5, 2.4, 'spread', 0] = enemy, how many, seconds between them, formation
(spread, center, cluster, edges), and the second of the wave
when the group starts. Add or remove groups to change a wave. TOTAL_WAVES (30) is the campaign
length; after it comes Endless mode.
Optional check with Node.js: run npm test in source/. One test plays the campaign with
a simple bot and tells you if the balance became impossible.
13. Recipe J: prices, rewards and upgrades
| Setting in BAL | Default | What it does |
|---|---|---|
plantPrice |
12 | Price of a level 1 turret |
priceGrowth |
1.95 | Each turret level costs this many times the previous one |
inflation |
1.055 | Each purchase makes the next one 5.5% more expensive |
waveBonus |
12 | Coins for holding a wave (grows with the wave number) |
richSoil.cost |
70 | First Power Boost upgrade (+12% damage each) |
sturdyFence.cost |
55 | First Strong Barrier upgrade (+20% barrier health each) |
fence.patchCost |
12 | Quick Patch (restores 40% of the barrier once per wave) |
seedLineCostMul |
7 | Recruitment upgrade price (times the turret price) |
Enemy rewards are the reward numbers in PESTS (recipe E).
14. Recipe K: colors, buttons and the font
-
Text colors: at the top of
css/game.css, inside:root:--ink(dark text,#3a2416) and--cream(light text,#fff4dc). Change the color code; any color picker gives you one. -
Buttons and panels are pictures, so their colors change with recipe A:
assets/ui/btn-green.webp,btn-gold.webp,btn-orange.webp,btn-cream.webp,panel.webp,ribbon-win.webp,ribbon-lose.webp,ribbon-pause.webp. Overlay screen styles are incss/screens.css. -
Font: the game uses Fredoka (SIL Open Font License), files in
assets/fonts/. To use another font: download it as WOFF2 (for example from Google Fonts, then converted with a WOFF2 converter), put the files inassets/fonts/, change the four@font-faceblocks at the top ofcss/game.cssto the new file names and the new name, and change--fontin:root. Keep the license file of the font you add. -
Sizes: everything is measured in
--u(1% of the game height), so the layout scales on every screen. To make one element a little bigger, find its rule in the CSS and raise the number before* var(--u)a little.
15. Internal names in the code
The game engine is shared with other templates of ours, so some names in the code are neutral keys that the
player never sees. Only the texts in src/i18n/ reach the screen.
| In the code | In the game |
|---|---|
plants, p1 ... p12, assets/plants/pN-F.webp |
Turrets, levels 1 to 12 (Cadet Cannon ... Vortex Core) |
pests: aphid, hopper, beetle, snail, slug, stinkbug, bombardier |
Pirate fighters, drones and gunships |
rhino, wasp, megasnail |
Bosses: Ram Destroyer, Star Corsair, Void Driller |
fence, assets/env/fence.webp |
The star base barrier |
shed |
The Star Base (upgrades screen) |
bees / fertilizer |
Squadron power / Overdrive power |
packet |
Supply pod |
richSoil / sturdyFence / seedLine |
Power Boost / Strong Barrier / Recruitment upgrades |
planter, assets/env/planter.webp |
The turret dock (the grid of slots on the right) |
hazel-wave, hazel-sit, hazel-cheer, hazel-worried (assets/ui/) |
The robot captain mascot poses |
seaTransition(), src/app/sea-transition.js |
The star-spark transition between screens |
panorama(..., water, reef, space) |
Optional edge art for other themes; not used here |
16. Check and publish your changes
- Play at least one full wave on your computer: recruit, merge, hold the wave, and let the barrier fall once.
-
If you edited
source/and have Node.js: runnpm testand thennpm run build. The new game is written tosource/dist/. Without Node.js, copy the files you changed fromsource/into the same places ingame/. -
Upload the contents of
dist/(orgame/) to your web hosting with any FTP program (for example the free FileZilla) or your host's file manager. Keep all folders next toindex.html. -
Open the address in a private window. If players still see the old version, clear your host or CDN cache;
adding
?v=2to the address helps check. - Never upload
source/,node_modules/or the ZIP to the public game folder.
17. If something goes wrong
-
Black or empty page after an edit: press
F12, open the Console tab and read the first red line; it names the file and line. Usually a missing quote or comma. Restore the file from your backup if needed. -
A picture is missing: the name or folder is different (names are case sensitive on most
servers:
Logo.webpis notlogo.webp). - A picture looks stretched: it does not have the original width and height (recipe A).
- No sound: browsers start sound only after the first tap or key press; check the in-game Sound menu.
- Progress reset: progress is kept per browser and per website address; a new address or a new save name (recipe B) starts fresh.
Need help or custom work? Write to willian@polargames.com.br with the version (1.0.1), your browser and a screenshot.