Customization Guide
Make Skullroll your own game: a new character, new backgrounds and pieces, your own logo, texts, music and sounds, and easier or harder levels. Every recipe below is a short list of steps and says exactly which file to open. You do not need to know how to program. All pictures on this page are real screenshots of the game in this package.
1. Before you start
Free tools you need:
- A code text editor: Visual Studio Code (Windows, Mac, Linux) or Notepad++ (Windows). Do not use Word or WordPad: they break the files.
- An image editor that can export WebP with a transparent background: Photopea (in the browser), GIMP or Krita. You can also draw in any program, save as PNG and convert the PNG to WebP at squoosh.app.
- For music and sounds: Audacity (exports MP3).
Which folder to edit. The download has two copies of the game:
game/is the finished game. Simplest way: change files directly insidegame/and upload that folder. No other tools are needed.source/is the same game with tests and a local server. If you use it, editsource/and runnpm run build: it copies the game tosource/dist/, and that folder is what you upload. Pick one way and keep to it.
The paths in this guide (for example assets/art/logo.webp) are the same inside both folders.
See your changes on your computer. The game must be opened from a web address, not by
double-clicking index.html. Two easy ways:
- With Python (python.org): open a terminal in the game folder, run the command below and open
http://localhost:8080. - With Node.js: in
source/, runnpm run serveand openhttp://localhost:5347. It showssource/;npm run serve -- distshows the builtsource/dist/instead.
python -m http.server 8080After each change, reload the page with Ctrl+F5 (Windows) or Cmd+Shift+R (Mac) so the browser does not show the old file.
localhost or 127.0.0.1) a
few shortcuts help you check your work. Add them to the address, for example
http://localhost:8080/?level=38&unlock:
?level=38&unlockopens level 38 even if it is still locked;?screen=levelsopens the levels screen;?notutorialskips the guided first level;?lang=ptshows the game in another language (this one also works on a published site).
Saved progress. The game saves stars and settings in the browser under names that start with
skullroll.template.save.v1 (STORAGE_PREFIX in src/config.js). If you put two copies
of the game on the same website, give each copy its own prefix so they do not share progress.
2. Where everything is
The numbers on each screenshot match the table below it. Texts are named by their key in
src/locales.js (recipe E). All pictures are in assets/art/.
water* (and "river" in the code), its small decorations are b* and
fl*, the open grave is drain, the crypt door is spout, the stone plate is
basket, a sugar skull is a "marble" in the code, and the main orange button is
pill-green*. Players never see these names.Title screen
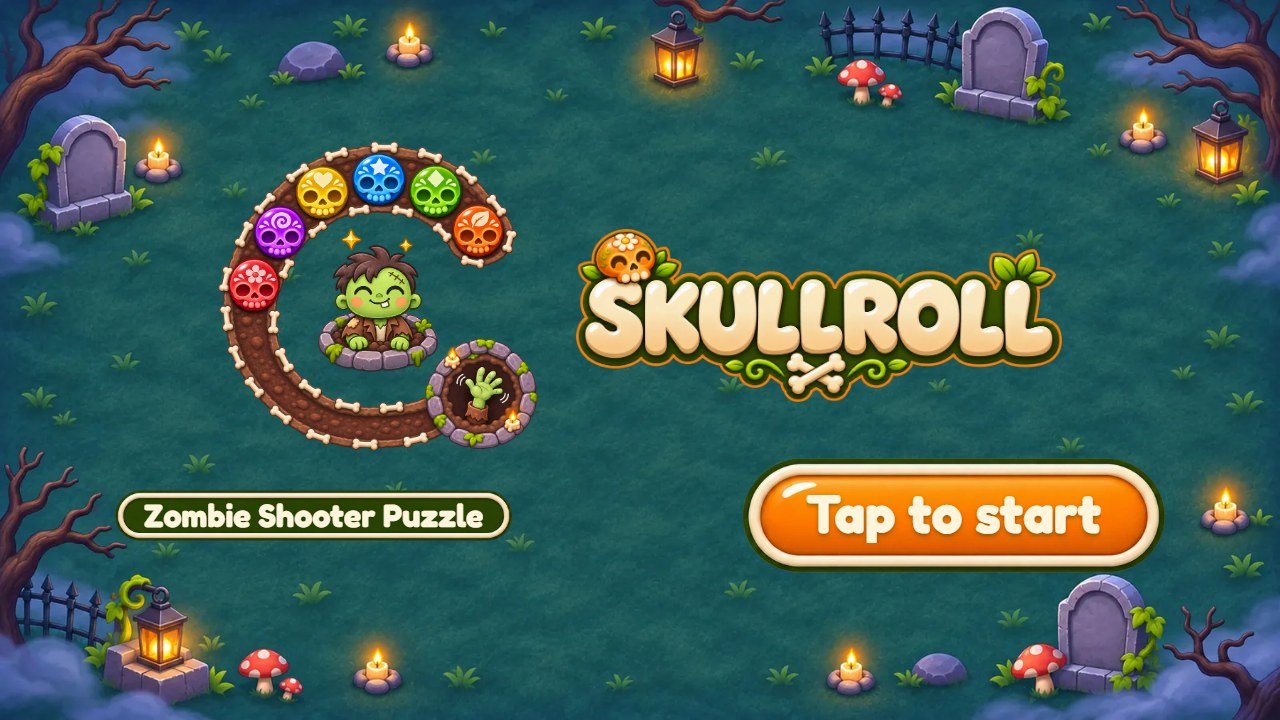 1
2
3
4
5
| # | What you see | File to change |
|---|---|---|
| 1 | Logo | assets/art/logo.webp (recipe B). The logo appears only on this screen. |
| 2 | Subtitle | The words "Zombie Shooter Puzzle" are written in index.html (recipe B). Plate picture: assets/art/pill-glass-790.webp. |
| 3 | Title picture | assets/art/title-hero.webp: the zombie, its grave, the sugar skulls and the path are one picture. When the player taps the button, the zombie ducks into its grave: dive.webp. |
| 4 | Tap to start button | Text: key tapToStart in src/locales.js (recipe E). Button picture: assets/art/pill-green-rim-370.webp. |
| 5 | Background | The title always shows the world 1 background: assets/art/bg1-land.webp on this wide screen (recipe D). |
Home screen
 1
2
3
4
5
6
7
8
9
| # | What you see | File to change |
|---|---|---|
| 1 | Stars earned | Star: assets/art/star.webp. Plate: pill-glass-*.webp. Up to 3 stars per level, 150 in all. |
| 2 | Settings button | Icon: assets/art/i-gear.webp. Round button: round-glass.webp. |
| 3 | World card | Texts: keys world ("World 2") and w2 ("Pumpkin Patch"). Card color: the .card rules in style.css (recipe J). |
| 4 | World progress | Levels finished in this world, out of 10. Drawn by style.css, no picture. |
| 5 | Path preview | Drawn by the game from the pieces of the world: the dirt of the path water2.webp, the small decorations b21.webp to b26.webp, the sugar skulls and the zombie (recipes C, D and F). |
| 6 | Play button | Texts: keys play and level. Button picture: assets/art/pill-green-rim-315.webp. |
| 7 | Levels button | Text: key levels. Icon: i-grid.webp. Button picture: pill-teal-390.webp. |
| 8 | Waving zombie | assets/art/zombie-wave.webp (recipe C). |
| 9 | World background | One set per world. Here assets/art/bg2-land.webp: the home screen shows the world of the next level to play (recipe D). |
Levels screen
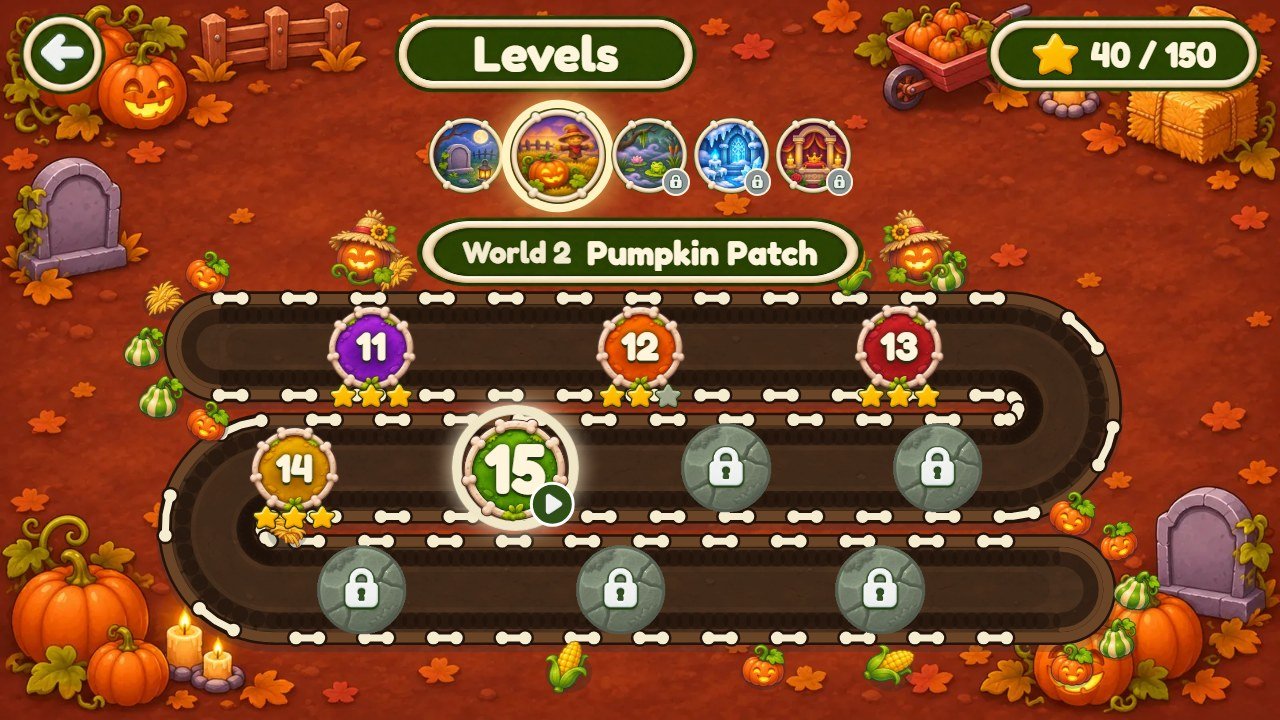 1
2
3
4
5
6
7
8
9
| # | What you see | File to change |
|---|---|---|
| 1 | Back button | Icon: assets/art/i-back.webp. |
| 2 | Screen title | Text: key levels. Plate: pill-glass-*.webp. |
| 3 | Stars earned | Star: assets/art/star.webp. Plate: pill-glass-*.webp. Up to 3 stars per level, 150 in all. |
| 4 | World badges | assets/art/badge1.webp to badge5.webp, one per world. Lock: i-lock.webp. |
| 5 | World name | Texts: keys world and w1 to w5. The ornaments on both sides: deco1.webp to deco5.webp, one per world. |
| 6 | Finished level | Medallion: t0.webp to t5.webp, in turn. Stars: star.webp and star-off.webp. |
| 7 | Next level | Always the green medallion t3.webp, with the play icon i-play.webp. |
| 8 | Locked level | Stone ball: assets/art/m-lock.webp; lock: i-lock.webp. |
| 9 | Path of the levels | Drawn by the game with the dirt water2.webp and the small decorations b21.webp to b26.webp (pumpkins and corn in this world). Each world uses its own (recipe D). |
A level (level 38, Frozen Chapel)
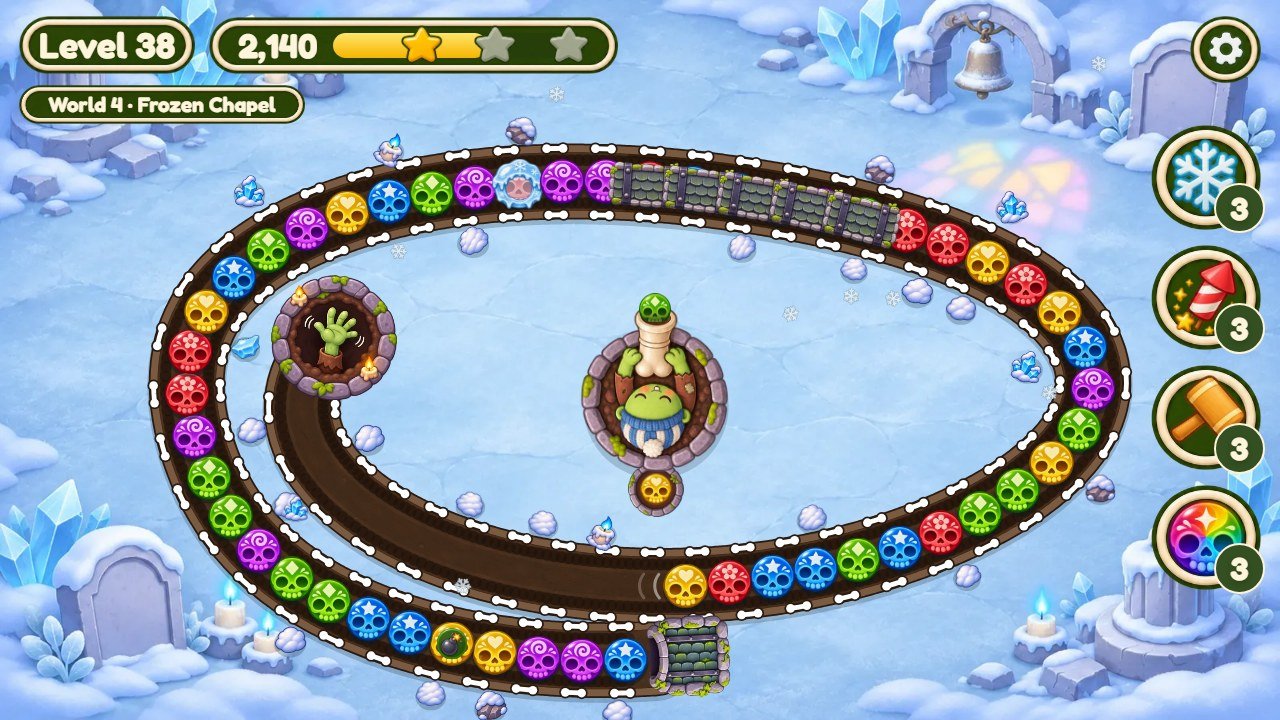 1
2
3
4
5
6
7
8
9
10
11
12
13
14
15
| # | What you see | File to change |
|---|---|---|
| 1 | Level number | Text: key level. Plate: pill-glass-*.webp. |
| 2 | Score and star bar | Stars: star.webp and star-off.webp. The points needed for each star: recipe G. |
| 3 | World of this level | Texts: keys world and w4. On level 1 it shows the key tutorial. |
| 4 | Pause button | Icon: assets/art/i-gear.webp. It opens the pause window. |
| 5 | Sugar skull | Six colors, one picture each: m0.webp for red up to m5.webp for orange (recipe F). |
| 6 | Special skull (bomb) | A round piece with an icon, in place of a sugar skull: assets/art/p-bomb.webp. The others are p-bomb, p-slow (snail), p-rev (rewind) and p-bolt (lightning). Recipes F and I. |
| 7 | Frozen skull | The ice shell drawn over the skull: assets/art/ice.webp. How many per level: recipe G. |
| 8 | Crypt door | Where the skulls come in: assets/art/spout.webp. |
| 9 | Tunnel | Stone covers drawn one after another: assets/art/slab.webp. The skulls roll under them. Where tunnels are: recipe G. |
| 10 | Open grave | assets/art/drain.webp (one waving hand) and drain-awake.webp (two hands, when the skulls get close). If the first skull reaches it, the level is lost. |
| 11 | Path decorations | One set of six pieces per world, here b41.webp to b46.webp. The painted dirt is water4.webp; the path colors are in src/config.js (recipes D and J). |
| 12 | Zombie in its grave | assets/art/zombie4.webp and its seven poses: one set per world (recipe C). |
| 13 | Next skull | Stone plate: assets/art/basket.webp. Tapping the zombie swaps the two skulls. |
| 14 | Power-ups | Pictures: h-freeze.webp, h-rocket.webp, h-hammer.webp, h-rainbow.webp. Names: keys hFreeze, hRocket, hHammer, hRainbow. Recipe I. |
| 15 | World background | assets/art/bg4-land.webp here: Frozen Chapel, world 4, on a wide screen (recipe D). |
3. More screens of the game
The windows share the same pieces: the green window and its light border are drawn by style.css (recipe
J), the titles sit on pill-glass-*.webp plates and the buttons are pill-green*,
pill-amber*, pill-blue* and pill-teal* pictures (recipe A explains the numbers
in these names). Round buttons in windows use round-solid.webp.
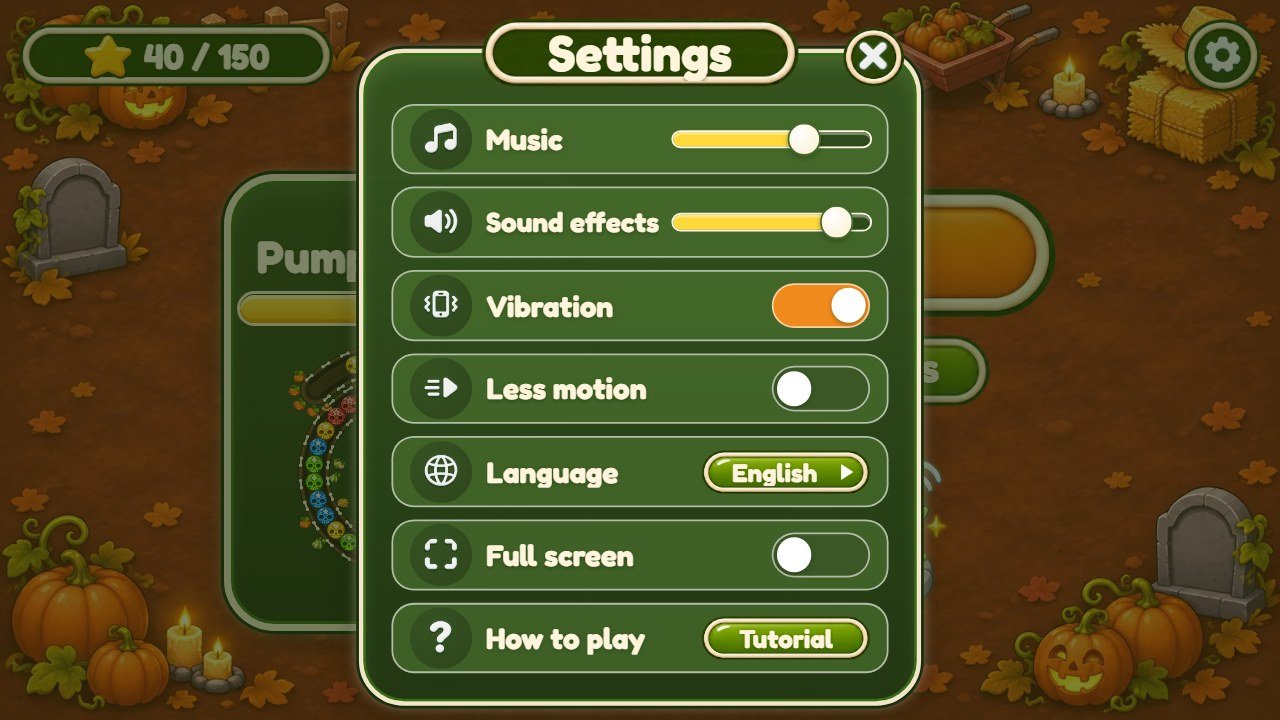
i-music, i-sfx, i-vib, i-motion, i-lang, i-full, i-help.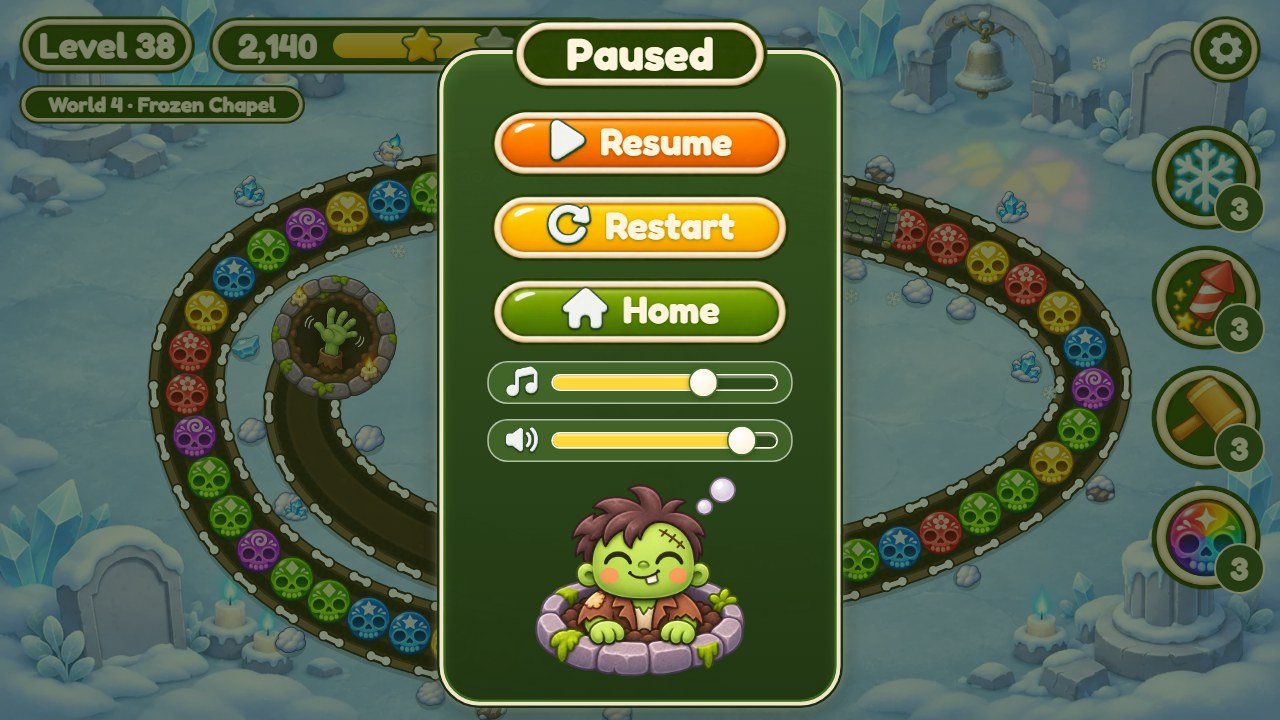
paused, resume, restart, home.
Icons i-play, i-replay, i-home;
the sleeping zombie is zombie-nap.webp.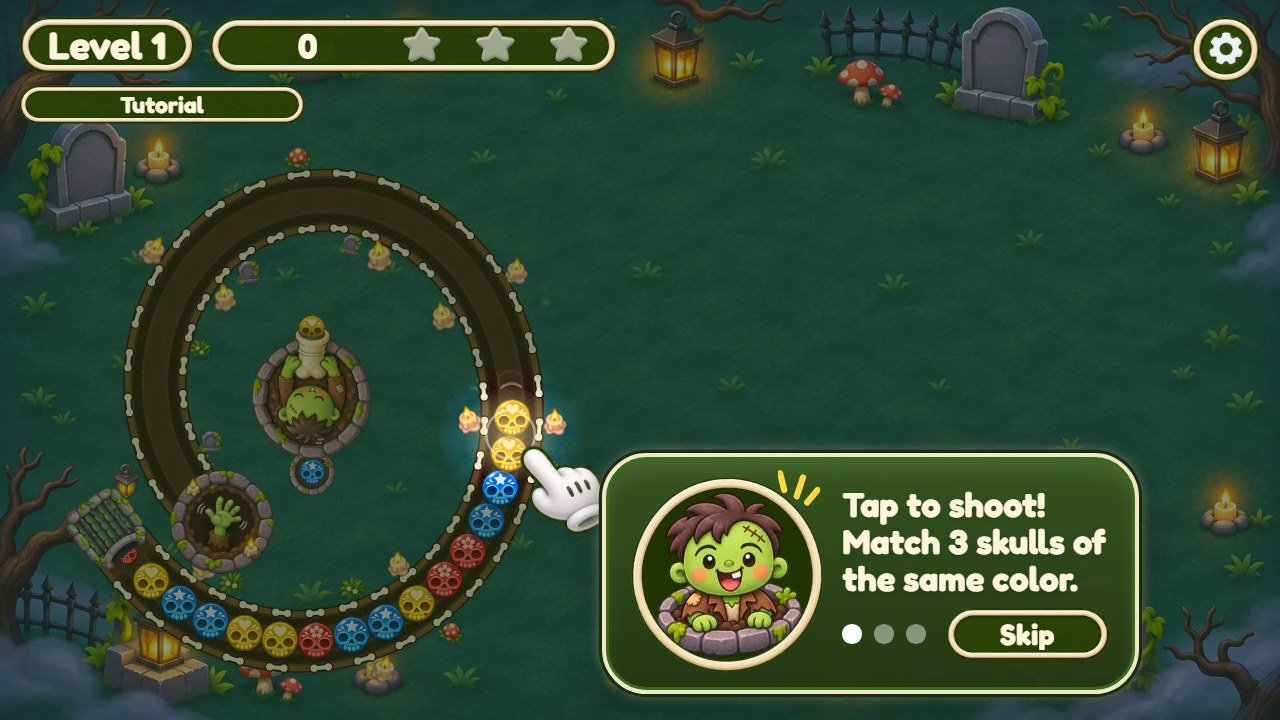
tut1, tut2 (tut2pc on computers), tut3 and skip.
Face: zombie-face.webp;
pointing hand: hand.webp.
The first time a new piece appears, the same bubble shows one of the keys tipTunnel,
tipBridge,
tipDuo,
tipIce,
tipBomb,
tipSlow,
tipRev,
tipBolt.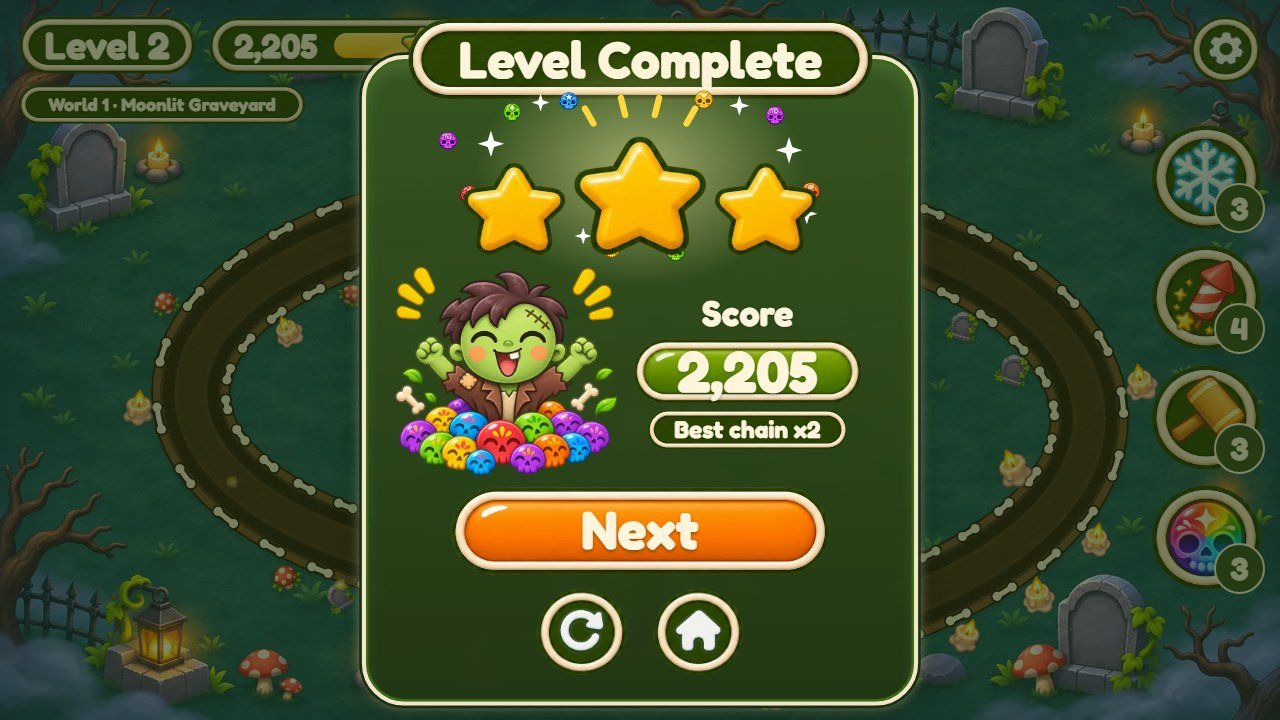
levelComplete, score, bestChain, next.
Zombie: zombie-cheer.webp;
stars star.webp;
score plate pill-teal-360.webp;
a new best score shows stamp-green.webp with the key newRecord.
oops, or soClose when at least 30% of the line was cleared.
Also cleared and tryAgain.
Zombie: zombie-dizzy.webp;
icons i-grid and i-home.
journey, totalScore, collect3 (shown while some level has fewer than 3 stars) and menu.
Pictures: badge1 to badge5, i-check, zombie-journey.webp.
bg2-port.webp.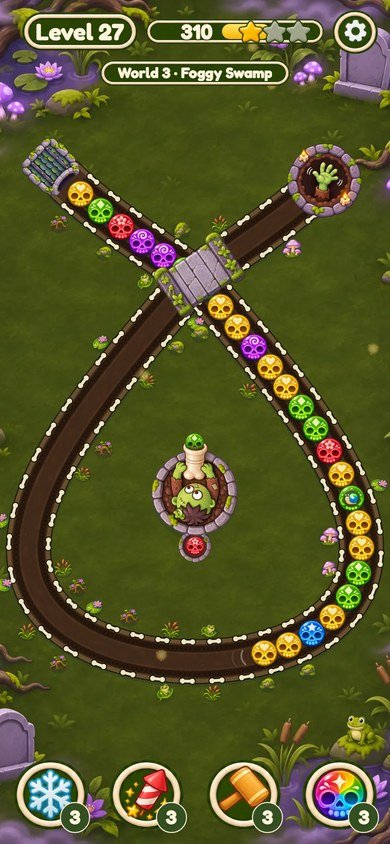
bridge.webp;
the small pieces along it are b31.webp to b36.webp, fl31.webp and fl32.webp.4. Recipe A: replace a picture
All pictures are in assets/art/ in WebP format. The game finds each picture by its file name, so a new
picture with the same name simply takes its place.
- Find the file with the screens above or by its name:
bg*backgrounds,zombie*zombie,m*sugar skulls,t*level medallions,p-*special skulls,h-*power-ups,i-*icons,pill-*buttons and plates,b*path decorations,water*painted dirt,badge*anddeco*world ornaments. Effects:burst,shock,spark,puff1topuff3,splash1tosplash4. - Open the old picture in your image editor and note its width and height.
- Make your new picture with the same width and height and a transparent background
(except the
bg*backgrounds and thewater*strips). Keep the drawing in the same position inside the picture. - Export as WebP with the exact same name, for example
star.webp, and replace the old file. - Reload the game with Ctrl+F5.
Buttons and plates come in several shapes. They are never stretched out of shape: each button uses
the picture made for its proportion. The number at the end of the name is the width divided by the height, times 100.
For example pill-green-435.webp is 700 x 161 pixels (4.35 times as wide as tall) and
pill-glass-790.webp is 7.9 times as wide as tall. So:
- To recolor or redraw a kind of button, change every file of that kind: for the main orange buttons (the files are still called "green"),
pill-green.webp,pill-green-315.webp,pill-green-370.webp,pill-green-435.webp,pill-green-rim-315.webpandpill-green-rim-370.webp. Otherwise some buttons keep the old look. - Keep each file's exact width and height. To see where a file is used, search
style.cssfor its name.
5. Recipe B: change the logo and the game name
- Logo: replace
assets/art/logo.webp(1100 x 391 pixels, transparent background). - Title picture:
assets/art/title-hero.webp(900 x 871) is the zombie in its grave next to the logo. - Browser tab name: open
index.htmland change the text between<title>and</title>. A little below, change the name insidealt="Skullroll"too (screen readers read it). - Subtitle under the logo: the words
Zombie Shooter Puzzleare written directly inindex.html, on the line withclass="plate sub". They are not translated: every language shows the same words. - Tab icon: the line
<link rel="icon" href="./assets/art/m2.webp" />inindex.htmluses the blue sugar skull. To use your own icon, save it inassets/art/(for exampleicon.png) and change the address on that line to./assets/art/icon.png. Keep it insideassets/:npm run buildcopies onlyindex.html,style.css,src/andassets/. - Browser bar color on phones: the line
theme-colorinindex.html.
6. Recipe C: change the zombie
The zombie in its grave is drawn from above, and each world has its own set of eight pictures, with a different
thing on its head (here for world 1; world 2 uses zombie2*.webp, and so on up to zombie5*.webp):
| Picture | When it shows |
|---|---|
zombie1.webp | resting with eyes closed, after 12 seconds without a shot |
zombie1-aim.webp | the normal pose: awake, eyes open |
zombie1-recoil.webp | just after a shot |
zombie1-cheer.webp | after a big chain and when the level is won |
zombie1-scared.webp | when the skulls are close to the open grave and when the level is lost |
zombie1-ear.webp | a quick twitch while resting |
zombie1-yawn.webp | sometimes, a yawn while resting |
zombie1-peek.webp | when the mouse moves (computers) |
- All eight are 800 x 800 pixels: the grave is a circle with a radius of 150 pixels in the middle, and the bone launcher points to the right. The game turns the picture to aim. Keep the grave and the launcher in the same place in every pose.
- The game knows where the mouth of the launcher is in each world:
tipinsrc/launcher-art.js, the distance from the middle of the grave to the skull in the launcher, in grave radii (1.18 means 1.18 x 150 = 177 pixels). If your launcher is longer or shorter, change that number for the world. - The other zombie pictures:
zombie-wave.webp(home),zombie-face.webp(tips and the tutorial),zombie-cheer.webp(level complete),zombie-dizzy.webp(level lost),zombie-nap.webp(pause),zombie-journey.webp(Journey Complete),title-hero.webpanddive.webp(title screen).
7. Recipe D: change the backgrounds and the worlds
There are 5 worlds of 10 levels. Each world has its own pictures:
| # | World | Levels | Its pictures |
|---|---|---|---|
| 1 | Moonlit Graveyard (key w1) | 1 to 10 | bg1-*.webp (5 files), badge1.webp, deco1.webp, water1.webp, b11.webp to b16.webp, zombie1*.webp (8 files) |
| 2 | Pumpkin Patch (key w2) | 11 to 20 | bg2-*.webp (5 files), badge2.webp, deco2.webp, water2.webp, b21.webp to b26.webp, zombie2*.webp (8 files) |
| 3 | Foggy Swamp (key w3) | 21 to 30 | bg3-*.webp (5 files), badge3.webp, deco3.webp, water3.webp, b31.webp to b36.webp, zombie3*.webp (8 files) |
| 4 | Frozen Chapel (key w4) | 31 to 40 | bg4-*.webp (5 files), badge4.webp, deco4.webp, water4.webp, b41.webp to b46.webp, zombie4*.webp (8 files) |
| 5 | Royal Mausoleum (key w5) | 41 to 50 | bg5-*.webp (5 files), badge5.webp, deco5.webp, water5.webp, b51.webp to b56.webp, zombie5*.webp (8 files) |
World names are the keys w1 to w5 in src/locales.js (recipe E). The file
names stay the same even if your world has another theme; players never see them.
Each background comes in five shapes, so it is never cut badly on any screen. The game picks the file that matches the shape of the screen. For world 1:
| File | Size (pixels) | Used on |
|---|---|---|
bg1-land.webp | 1600 x 900 | Wide screens: computers and phones turned sideways |
bg1-port.webp | 900 x 1600 | Phones held upright |
bg1-l43.webp | 1280 x 960 | Tablets turned sideways (about 4:3) |
bg1-p34.webp | 960 x 1280 | Tablets held upright (about 3:4) |
bg1-sq.webp | 1280 x 1280 | Almost square windows |
- Replace all five files of a world, each with the same width and height. If you change only one, the old background still shows on other screens.
- Keep the middle calm, without strong details: the path and the buttons are drawn there. Put the details near the corners.
- The title screen always uses the world 1 background. The home and levels screens use the world of the next level (or the world chosen on the levels screen).
The path of each world is drawn by the game (its files and code names say "water" and "river"):
water1.webptowater5.webp(1200 x 166) are strips of painted dirt laid along the path. The left and right ends must join without a seam. The small bones on both edges are drawn by the game (colorboneinWORLDS).b11.webptob16.webp(world 1) up tob51.webptob56.webpare the small pieces along the path: candles, mushrooms, pumpkins, ice crystals, golden cups and so on.- Two more small pieces per world:
fl11andfl12up tofl51andfl52. The specks that drift over the screen in each world (fireflies, embers, falling leavesmaple-o, snow) are the listambientinFEEL, insrc/config.js. - The colors of the path edge and dirt (
rim,shallow,band,deep,shine) are inWORLDSinsrc/config.js, one line per world.
8. Recipe E: change texts and translations
All texts players read are in two files: src/locales.js (English, Portuguese, Spanish) and
src/locales-more.js (French, German, Italian, Dutch, Polish, Turkish, Russian, Indonesian, Japanese,
Korean, Chinese). Each language is a block of lines like these:
  tapToStart: 'Tap to start',
  play: 'Play',
  level: 'Level {n}',
w1: 'Moonlit Graveyard',- Find the text you want to change (Ctrl+F in your editor). The word before the colon is the key; never change it.
- Change only the words inside the quotes. If your text has an apostrophe, like
Let's, put double quotes around the text:"Let's go!". - Keep markers such as
{n}and{name}: the game puts a number or a name there. - Change the same key in the other languages you use. A key missing from a language shows the English text.
- If you use
source/, runnpm test: it checks that the 14 languages still have every key and every marker.
Two texts are not in these files: the subtitle under the logo and the browser tab name (recipe B).
9. Recipe F: change the sugar skulls
There are six skull colors, one picture each. Every color also has its own mark on the forehead, so players who confuse colors can still tell them apart. The numbered medallions of the levels screen are separate pictures.
| # | Color | Pictures |
|---|---|---|
| 0 | red (flower on the forehead) | m0.webp; level medallion t0.webp |
| 1 | yellow (heart on the forehead) | m1.webp; level medallion t1.webp |
| 2 | blue (star on the forehead) | m2.webp; level medallion t2.webp |
| 3 | green (diamond on the forehead) | m3.webp; level medallion t3.webp |
| 4 | purple (spiral on the forehead) | m4.webp; level medallion t4.webp |
| 5 | orange (leaf on the forehead) | m5.webp; level medallion t5.webp |
- Keep them round, the same size as the old pictures (about 128 x 128 pixels), with a transparent background.
m-wild.webpis the rainbow skull (recipe I) andm-lock.webpthe locked level.MARBLEandMARBLE_DARKinsrc/config.jsare the same six colors, in the same order, for the sparks, the flying points and the plain balls the game draws if a picture is missing. If you change a skull's color, change its line there too.- Special skulls are round pieces with an icon:
p-bomb.webp,p-slow.webp,p-rev.webpandp-bolt.webp. Frozen skulls get the shellice.webp.
10. Recipe G: make the levels easier or harder
The 50 levels are not drawn by hand. Each one is a line of a table in src/levels.js, and the game builds
the path for the screen it is playing on. The table is called PLAN: one block per world, one line per
level. These are the last lines of world 2:
    ['spiral', { bomb: 2 }, 1],
    ['bean', { slow: 1, bomb: 1 }],
['spiral', { slow: 1, bomb: 2 }, 2],| Part of the line | What it means |
|---|---|
| 1st: the path shape | 'oval', 'spiral', 'bean', 'serp' (zigzag), 'eight' (the path crosses itself over a bridge) or 'duo' (two paths, two lines of skulls). On wide screens a zigzag is played as a bean. |
| 2nd: special skulls | How many of each: bomb, slow (snail), rev (rewind), bolt (lightning). {} or nothing means none. |
| 3rd: tunnels | 0 or nothing: none; 1: one short tunnel; 2: two tunnels. Where they are: TUNNELS, as parts of the path (0.42 is 42% of the way). |
| 4th: frozen skulls | How many skulls start frozen. |
- Colors per level:
COLORS, one line per world: the number of colors for levels 1 to 5 and for levels 6 to 10 of that world (3 to 6). Fewer colors is easier. - Length, speed and how mixed the colors are rise smoothly from level 1 to 50. They are the lines
of
getLevel(n)in the same file:count(how many skulls),speed(how fast the line rolls, from 0.36 to 0.8),rollTo(how far the line rushes in at the start) andclump(from 0.56 to 0.24: lower values mix the colors more). To make every level slower, lower the two numbers inlerp(0.36, 0.8, t), for example tolerp(0.3, 0.6, t). - Stars: finishing a level gives 1 star. 2 and 3 stars need points:
star2andstar3inRULES_UI, insrc/config.js. Lower numbers give stars more easily. - Special skulls and the danger zone:
RULESat the top ofsrc/chain.js:slowS(seconds the snail slows the line, 8),slowMul(how slow, 0.4),revS(seconds the line rolls back, 3),bombReach(blast size, 3.5 skulls),freezeS(seconds of the freeze power-up, 6),dangerFrom(0.85: the last 15% of the path, where the line slows down). - After changing levels, open a terminal in
source/and runnpm test. It builds the path of all 50 levels on seven screen sizes and fails if one cannot be built (for example, a line too long for its shape). The eight shape is made for about 47 to 55 skulls. The test also checks that level 50 stays much harder than level 2: more than twice the skulls, more than 1.8 times the speed and more colors. A flatter curve (for example the same number of colors in every world) makes that check fail.
npm testThis command needs Node.js; the main buyer guide explains how to install it, step by step.
11. Recipe H: replace music and sounds
Save your audio as MP3 with the same file name and replace the old file.
- Music (
assets/music/):menu.mp3plays on the home and levels screens andplay.mp3in the levels. The title screen is silent. Each track repeats: 2.5 seconds before the end, the next round starts and the two blend, so let your track fade out softly over its last 2 or 3 seconds. The blend time isMUSIC_TAILat the top ofsrc/audio/sound.js. - Recorded sounds (
assets/sfx/):plop1.mp3toplop5.mp3, the pop of the skulls. The game plays a different one each time. Their volume isGAINat the top ofsrc/audio/sound.js(0.55; 1 is full volume). - All the other sounds are not files: the game makes them with the numbers in
SYNTH, in the same file (fis the pitch in Hz,durthe length in seconds,gthe volume).
Name in SYNTH | When it plays |
|---|---|
shot | a shot |
swap | the two skulls are swapped |
clink | a skull joins the line |
clack | two parts of the line bump together |
bomb, slow, rev, bolt | a special skull pops |
freeze, rocket, hammer, wild | a power-up is used |
thaw | ice breaks |
heart, phew | skulls near the open grave, and safe again |
win, star, cheer | level won, each star, a big chain |
lose, sink | level lost |
ui_click, ui_back, ui_no, stamp | buttons and the "New record!" stamp |
splash, fill | the title screen: the zombie ducks into its grave and the menu comes in |
- To remove the music or the pops, delete the files: the game keeps working, silent where a file is missing (without the pop files it uses its own pop sound).
- Players set the Music and Sound effects volumes in Settings; the starting values are
VOLinsrc/config.js. On phones, sound starts after the first touch (a browser rule).
12. Recipe I: change the power-ups and the special skulls
The four power-ups are on the side of the level (pictures h-freeze, h-rocket,
h-hammer, h-rainbow; names: keys hFreeze, hRocket,
hHammer, hRainbow). Their numbers are in RULES_UI, in
src/config.js:
  startHelps: 3,
  rockets: 5,
hammerReach: 2.3,startHelps: how many of each power-up a new player has (3). The first time a level is finished with 3 stars, the player gets one more power-up, in turn.rockets: how many skulls the rockets hit (5).hammerReach: the size of the hammer blow, in skulls (2.3). The hammer shows the keyhammerHint.- Freeze stops every line for
freezeSseconds (inRULES,src/chain.js). The rainbow skull (m-wild.webp) matches any color. - Special skulls work when they pop: the bomb clears the skulls near it, the snail slows the line, rewind rolls the line back and lightning clears every skull of its color. Their numbers are in recipe G; their pictures in recipe F.
- The words that pop up during play are keys too:
nice,amazing,gap,freeze,slow,rev.
Change only the numbers. Keep the commas, braces and names exactly where they are. Power-ups are earned by playing; the game has no store and no real-money purchases.
13. Recipe J: change colors, buttons and the font
- Text colors: the block
:rootnear the top ofstyle.css:--ink(the cream text),--shade(the soft shadow under it) and--rim(the light border of the windows). Change the value after the colon, for example--ink: #fff;. - Window color: the rule
.panelwithlinear-gradient(...)near the end ofstyle.css; the home card is the rule.carda little further down. The two colors are the top and the bottom of the window. - Behind the game while it loads: the
backgroundofhtml, bodynear the top ofstyle.css. Browser bar color on phones:theme-colorinindex.html. - Buttons, plates and round buttons are pictures: recolor them in your image editor (Hue/Saturation) and save with the same names, every size of a color (recipe A).
- Path and skull colors:
WORLDSandMARBLEinsrc/config.js(recipes D and F). - Font: Fredoka, in
assets/fonts/, declared by the four@font-faceblocks at the top ofstyle.css. To use another font, add its.woff2files toassets/fonts/and change the file names in those blocks (and in thepreloadline ofindex.html). Check that its license allows use in games.
14. Check and publish your changes
- Play the parts you changed on your computer (see Before you start), in a wide window and in a narrow one (F12, then Ctrl+Shift+M shows phone sizes).
- If you edited
source/: in a terminal insidesource/, run the commands below. The first checks the rules, the levels and the texts; the second copies the game tosource/dist/.
npm test
npm run build- Upload everything inside
game/(orsource/dist/, if you built it) to your web hosting, replacing the old files. - Open your game address and press Ctrl+F5. If you still see the old version, read the section about updates and cache in the main buyer guide.
15. If something goes wrong
- The game stops on the first screen after you edit a
.jsfile: a comma, quote or brace is missing. Press F12 and open the Console: it shows the file name and the line with the error. Compare that line with your backup. - A picture is missing: the file name is different (names are case sensitive:
Logo.webpis notlogo.webp), or the file is not WebP. - A background or button still shows the old picture on some screens: it has other files for other screen shapes (recipes A and D).
- Nothing changed: the browser is showing the old file. Press Ctrl+F5, or open the game in a private window.
- Still stuck? Restore your backup and change one thing at a time. Support: willian@polargames.com.br (include the game version, what you changed and a screenshot).