Contents
1. Before you start
- Make a copy of the whole folder (backup). If something goes wrong, copy the file back.
- Use a plain-text code editor, for example Visual Studio Code (free). Do not use Word.
-
Edit the files in
source/. To see the result, open a terminal insource/and runnpm run serve, then openhttp://localhost:5197/(see the main guide, Development). Without Node.js you can edit the same files insidegame/and test them on your web host. - After each change, reload the page with Ctrl+F5 (Cmd+Shift+R on a Mac).
- Free picture tools: Squoosh (squoosh.app, converts PNG/JPG to WebP), GIMP, Krita, Photopea. Free sound tools: Audacity.
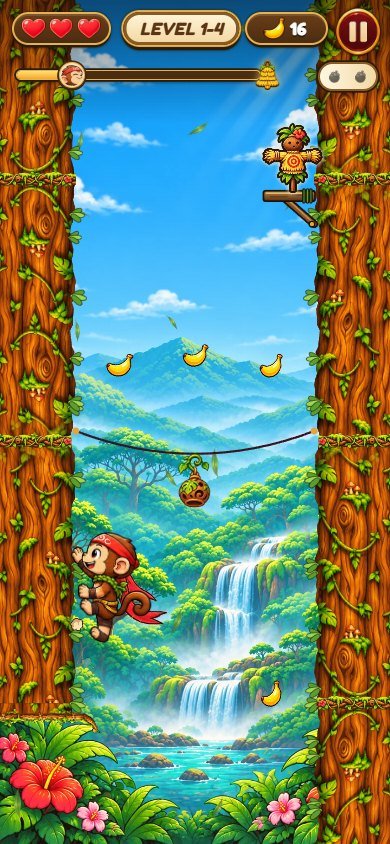
2. Which file draws each part of the screen
 123456
-
hearts:
assets/heart.webp,heart0.webp; count:TUNE.heartsinsrc/config.js -
level name and number: texts in
src/levels.js(names) andsrc/locales.js(level) - coins:
assets/coin.webp; style.capin the style files -
pause button:
assets/i-pause.webp; pause panel#m-pauseinindex.html -
height bar:
assets/bell.webp(the banana bunch) andk-head.webp;#barin the style files - purple fruits:
assets/jade.webp; how many: letterjin the level text
Everything else inside the level (walls, hero, enemies, bosses, items, effects) is drawn on a canvas by
src/view.js with the pictures of assets/. The screens and panels (title, map,
shop, settings, win, lose) are HTML in index.html with the style files.
3. Change pictures and the hero
-
All pictures are WebP files in
assets/. Find the one you want (open it in the browser or the editor). - Make your picture with the same size (width x height in pixels) and a transparent background where the original is transparent. Save it as WebP with the same file name and replace the old file.
- Reload the game. Nothing in the code needs to change.
The hero has one picture per pose: k-cheer.webp, k-climb1.webp,
k-climb2.webp, k-climb3.webp, k-climb4.webp,
k-cling2.webp, k-cut.webp, k-dashp.webp, k-dizzy.webp,
k-fall.webp, k-fall2.webp, k-fly1.webp, k-fly2.webp,
k-fly3.webp, k-head.webp, k-hurt.webp, k-idle.webp,
k-joy.webp, k-leap.webp, k-peek.webp, k-rope.webp,
k-slash.webp, k-wind.webp. Replace all of them to change the character; keep the
feet at the same place in the picture, because the game aligns the poses by the empty space under the feet.
The bandana color is painted at run time. The shop color is painted on the hero pictures while the game
runs: the strong red pixels (hue below 8 or above 346, saturated and not dark) of the
k-*.webp poses become the chosen color, keeping light and shadow (tintImage and
tintHero in src/art.js; the first color, crimson, uses the original pictures). If
your new hero has strong red parts that are not the bandana, they change color too.
Backgrounds of the levels: bg1.webp … bg5.webp (one per world); walls:
wall1.webp … wall5.webp; world maps: bg-map.webp,
bg-map2.webp … bg-map5.webp; bosses: boss1.webp,
boss2.webp, boss3.webp, bell-b1.webp, bell-b3.webp,
dragon-b1.webp, dragon-b3.webp, shadow-b1.webp,
shadow-b3.webp, oni-b1.webp, oni-b3.webp.
4. Logo and page title
- Logo: replace
assets/logo.webp(same size). -
Name in the browser tab: in
index.html, change the text between<title>and</title>, and thealt="Miko Climb"of the logo.
5. Change texts
-
Open
src/locales.js. The listKhas the name of every text (play,level,paused…); below it,Thas one list per language in the same order. -
To change "PLAY" in English, change the first text of the
enlist. Keep the quotes and the commas. {n}is replaced by a number (for example'LEVEL {n}'): keep it.-
Level names (in English) are in
src/levels.js; boss names are texts ofsrc/locales.js. - Run
npm test: it checks that every language still has every text.
6. Add or remove a language
-
In
src/locales.js, the listLANGShas one line per language: code, name shown in the menu, flag (pictureassets/flag-<flag>.webp). -
To add one: copy the
enlist inT, give it the new code, translate every text, add the line toLANGSand a flag picture. -
To remove one: delete its line in
LANGSand its list inT; the testlocales.test.mjscounts 14 languages, so change that number too. - Arabic (
ar) turns the page right to left automatically.
7. Edit levels
Open src/levels.js. The explanation at the top of the file is the legend. In short:
Fases do Miko Climb. Cada fase são 3 colunas de texto lidas DE BAIXO PARA CIMA (1 letra = 1 linha de 60 px):
  L / R (paredes):  # parede   B parede 1 recuo para dentro   C 2 recuos   . vão (sem parede)   ^ espinhos
                    d parede com boneco de coco   t parede com macaco rival (joga cocos)   a parede com besouro de armadura (só o impulso derruba)
                    x parede que desmorona 0,55 s depois do 1º toque   i parede de gelo (o herói escorrega para baixo)
  M (meio do poço): o moeda   c tucano que cruza   b morcego (voa em oito)   l lanterna (checkpoint)   j fruta roxa
O sino fica 2 linhas acima do topo. A ordem das linhas no arquivo é de baixo (início) para cima (fim).
-
CHUNKhas the pieces: three texts each (left wall, right wall, middle), read from bottom to top, one letter = one row of 60 pixels. Every piece starts and ends with two rows of wall on both sides, so pieces can follow each other in any order. -
World 1: the list
PLANhas, for each level, its name and its pieces in order (~before a name uses the mirrored piece). The 10th level of each world is the boss ('calm calm', '<boss>'). -
Worlds 2 to 5:
WORLDhas the 10 names of each world, the new pieces (NEW) and the boss; the pieces of each level are drawn from a fixed seed, so a level is always the same. To hand-write a level, write it inPLANinstead. -
Run
npm test. The robot plays every level; if one cannot be finished (or an item can only be taken by dying), the test names it. Then play it yourself:http://localhost:5197/?level=12.
8. Difficulty and feel
src/config.js has every number in one place, with a comment on each line:
-
TUNE.hearts(lives per level),climb(climbing speed),jumpVx/jumpVy(jump),dashVx(dash),crumble(time before a cracked wall falls),slide(ice),coyote(late-tap tolerance),warn(glow before the end of a wall),gravity,crowSpeed,shurikenSpeed,throwEvery. FEEL: hit-stop, screen shake, squash, particles, combo sounds, vibration.
After changing TUNE, run npm test: the robot checks the levels are still possible.
9. Shop colors and prices
SCARVES in src/art.js: each line is
[id, main color, edge color, price in bananas]. The first one is free and owned from the start.
The shop picture of each color is assets/scarf-<id>.webp; a new id needs a new picture with
that name. The two cloth tails of the bandana are drawn from assets/tail-<id>-a.webp and
tail-<id>-b.webp: a new color needs those two pictures too.
10. Music and sounds
-
Music (MP3, loops):
assets/music/m-boss.mp3,assets/music/m-game.mp3,assets/music/m-menu.mp3:m-menuon the menus,m-gamein the levels,m-bossin boss levels. Replace a file with your own MP3, same name. -
Sound effects (MP3):
bell,bosshit,bossroar,click,coin,crow,cut,dash,deflect,fall,hurt,jade,jump,lantern,lose,mark,star,straw,throw,wininassets/sfx/; the list isSFXinsrc/audio.js, the volumes areGAIN. The landing sound is synthesized insrc/audio.js. - Keep the files short and normalized (Audacity: Effect > Normalize).
11. Colors and fonts
-
Colors of buttons, panels and texts are in the style files (
style-2.css,style-3.css,style.css); search for a color code such as#ffd24aand change it. -
Fonts: the
@font-facerules at the top ofstyle.cssload the files ofassets/fonts/. To use another font, put its.woff2there (with its license), change thesrc: url(...)and keep thefont-familyname, or change the name everywhere it is used.
12. Internal names
Code comments are in Portuguese. These short names appear in the code:
| In the code | In the game |
|---|---|
hero |
the hero (Miko); events `hero-start`, `hero-lang`, `hero-prefs`; test object `window.__miko` |
k-*.webp |
the hero poses (k is the prefix of the engine) |
scarf, SCARVES |
Miko's bandana: the shop colors and the cloth tails drawn behind the hero |
jade |
purple fruits in the middle of the shaft (all of them = 1 star) |
lantern |
checkpoint: after a fall the hero comes back at the last lit lantern |
bell |
the goal at the top of a level; also the id of the world 2 boss (Giant Beehive) |
tengu, bell, dragon, shadow, oni |
boss ids: Gorilla King, Giant Beehive, Serpent Kite, Shadow Panther, Snow Yeti |
crow |
toucan |
dummy |
coconut dummy |
thrower, shuriken |
the rival monkey and its coconuts |
armor |
armored beetle (only the dash knocks it out) |
bat |
bat |
crum (x), ice (i), B / C, ^ |
cracked stones, ice wall, wall ledges, spikes (level letters) |
endless |
the endless tower (best height in meters) |
dash |
the dash (tap again in the air) |
13. Publish your version
- In
source/:npm test, thennpm run build. - Upload the contents of
source/dist/to your web host (replace the old files). - If the old version still appears, see "Updates and browser cache" in the main guide.
Support: willian@polargames.com.br