Customization Guide
Make Lantern Bites your own game: your own numbers, dishes, stalls, districts, texts, music, logo and colors. Every recipe below is a short list of steps and says exactly which file to open. You do not need to know how to program: you change numbers, texts between quotes and picture files. All pictures on this page are real screenshots of the game in this package.
1. Before you start
Free tools you need:
- A code text editor: Visual Studio Code (Windows, Mac, Linux) or Notepad++ (Windows). Do not use Word or WordPad: they break the files.
- An image editor: Photopea (in the browser), GIMP or Krita. Dishes, stalls, customers and interface pictures are PNG with a transparent background; sceneries are JPG.
-
To see the game on your computer, a browser and one of these: the local server included in
source/(npm run serve, needs Node.js, see the main guide), or any local web server you already use (for example XAMPP, WAMP or MAMP). Openingindex.htmlwith a double click does not work: browsers block the game files when the page comes from the disk.
game/ folder (or source/) to a
safe place before you change anything. If something breaks, put the backup back.
Which folder do I edit? The simplest way: edit the files inside game/ and upload
that folder. If you also use the developer tools, edit source/ instead and run
npm run build, which copies everything to source/dist/ (the same as
game/). Both folders have the same file names, so every recipe below works in either one.
Starting a new game while you test: the game saves progress in the browser. Open the pause menu
and choose Start over to see a change from the first minute. On your own computer (address
localhost) you can also open a district directly with ?debug&bairro=1 at the end
of the address (0 is the first district); this shortcut does nothing on a public website.
2. Where everything is
Each number on the screenshot matches a line of the table under it, with the exact file to change. Interface
texts are in src/locales.js (English and Portuguese) and in src/locales/ (one file for
each of the other 12 languages); the table gives the key of each text. <chain> is one of the
7 foods (grill, steam, tea, sweet, sea,
noodle, warm), <stall> uses the same 7 names, and
<id> is a district (porto, lotus, neve).
Title screen
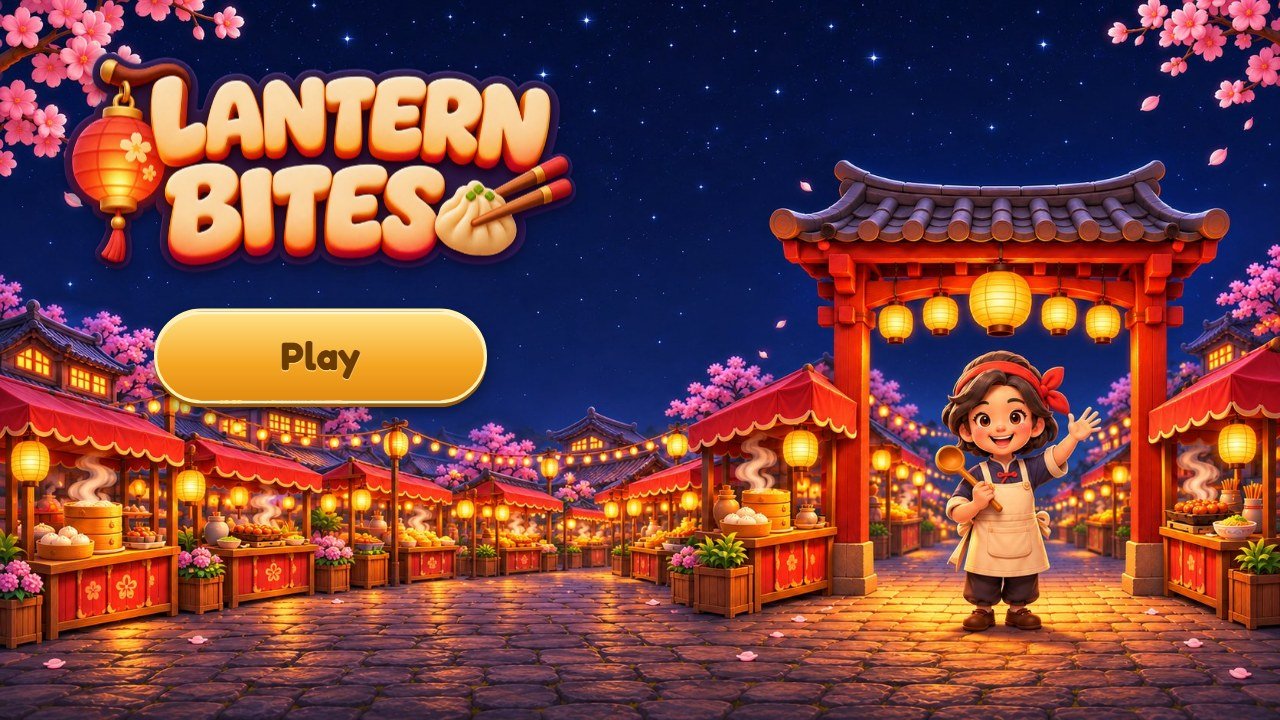 1
2
3
| # | What you see | File to change |
|---|---|---|
| 1 | Logo | assets/ui/logo.png, 900×388 pixels, transparent background (recipe G). |
| 2 | Play button |
Text: key ui.play (recipe E). Button picture: assets/ui/btn-gold-l.png,
btn-gold-m.png and btn-gold-r.png (recipe H).
|
| 3 | Title background |
assets/ui/splash-land.jpg on wide screens (1672×941) and
assets/ui/splash.jpg on phones held upright (941×1672), recipe G.
|
The counter
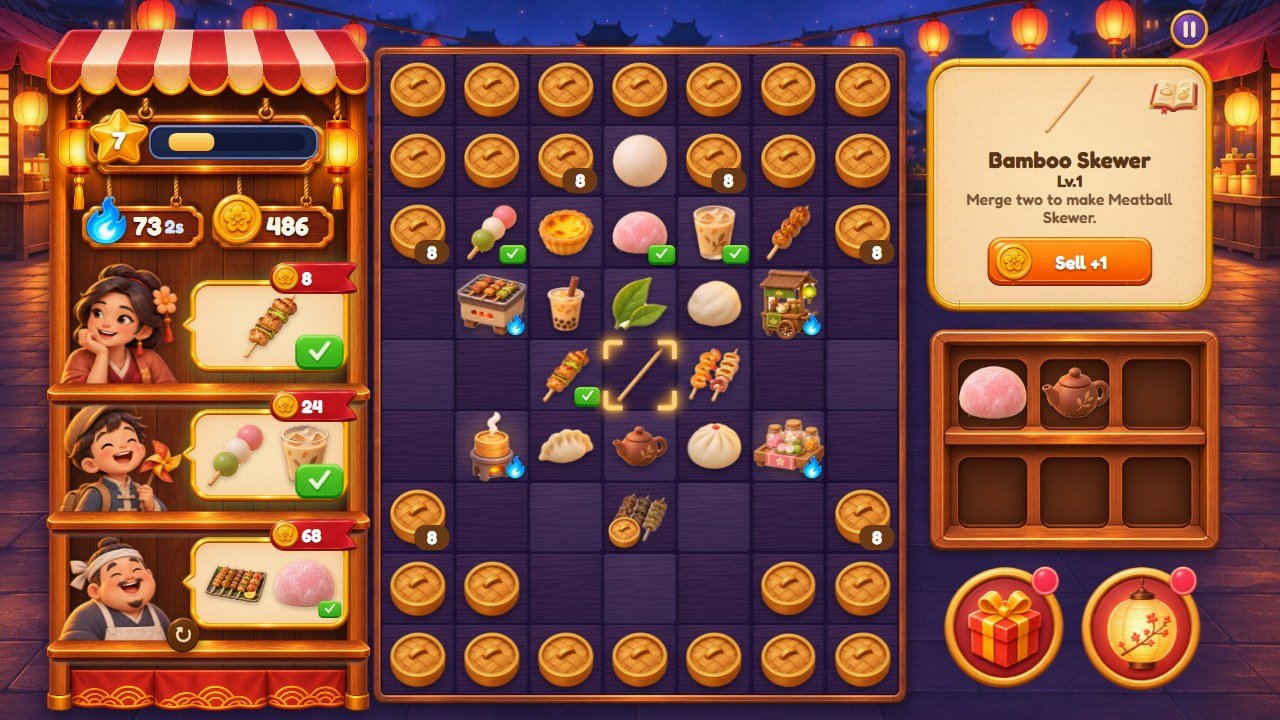 1
2
3
4
5
6
7
8
9
10
11
12
13
14
15
16
17
18
19
| # | What you see | File to change |
|---|---|---|
| 1 | Level |
Star: assets/ui/star.png. The bar fills with the stars of the lanterns:
STEP_STARS and STARS_PER_LEVEL in src/config.js (recipe A).
|
| 2 | Flames (energy) |
Icon: assets/ui/flame.png. Size of the tank and speed: ENERGY in
src/config.js (recipe A).
|
| 3 | Coins | Icon: assets/ui/coin.png. |
| 4 | Customer |
assets/ui/who-1.png to who-6.png in the first district; the same names inside
assets/bairros/<id>/ in the others (recipe C).
|
| 5 | Order and its pay |
What customers ask for and how much they pay: ORDERS in src/config.js (recipe
A). Pictures on wide screens: assets/ui/barraca-balao.png and
barraca-fita.png; on phones: assets/ui/tag.png.
|
| 6 | Ready button | assets/ui/btn-check.png. It appears when the dishes of the order are on the counter. |
| 7 | Market stall around the customers |
Wide screens only: assets/ui/barraca-fundo.png, barraca-prateleira.png,
barraca-placa.png, barraca-placa-p.png and barraca-corda.png.
|
| 8 | Counter squares |
assets/ui/tile-l.png (wide screens) and assets/ui/tile-p.png (phones); frame:
assets/ui/frame.png. The tint of each district is in style-more.css (recipe
H).
|
| 9 | Food stall |
assets/items/gen-<stall>-1.png to -5.png, one picture per stall level
(recipe B). Name: key gen.<stall>.
|
| 10 | Dish |
assets/items/<chain>-1.png to -8.png (recipe B). Names: the list
item.<chain>.
|
| 11 | Lid with a number |
assets/ui/lid.png. The level that opens each square is the list UNLOCK in
src/config.js.
|
| 12 | Name of the selected dish |
Texts: item.<chain>, ui.lv, ui.next (recipe E). Panel
picture: assets/ui/panel-plain.png.
|
| 13 | Sell button |
assets/ui/btn-orange.png (it turns into Serve with btn-green.png). Text:
ui.sell. Price: SELL in src/config.js.
|
| 14 | Recipe book button |
assets/ui/icon-9.png. Reward of a complete page: BOOK_REWARD in
src/config.js.
|
| 15 | Shelf |
assets/ui/shelf-land.png (wide screens), shelf-port.png and
slot-port.png (phones).
|
| 16 | Gift box | assets/ui/btn-gift.png; the red dot is dot.png. |
| 17 | Street button | assets/ui/btn-lantern.png. |
| 18 | Pause button | assets/ui/btn-pause.png. |
| 19 | Scenery behind the counter |
scene-land.jpg (wide screens, 1672×941) and scene.jpg (phones, 1914×822), in
assets/ui/ for the first district and in assets/bairros/<id>/ for the
others (recipe C).
|
The street
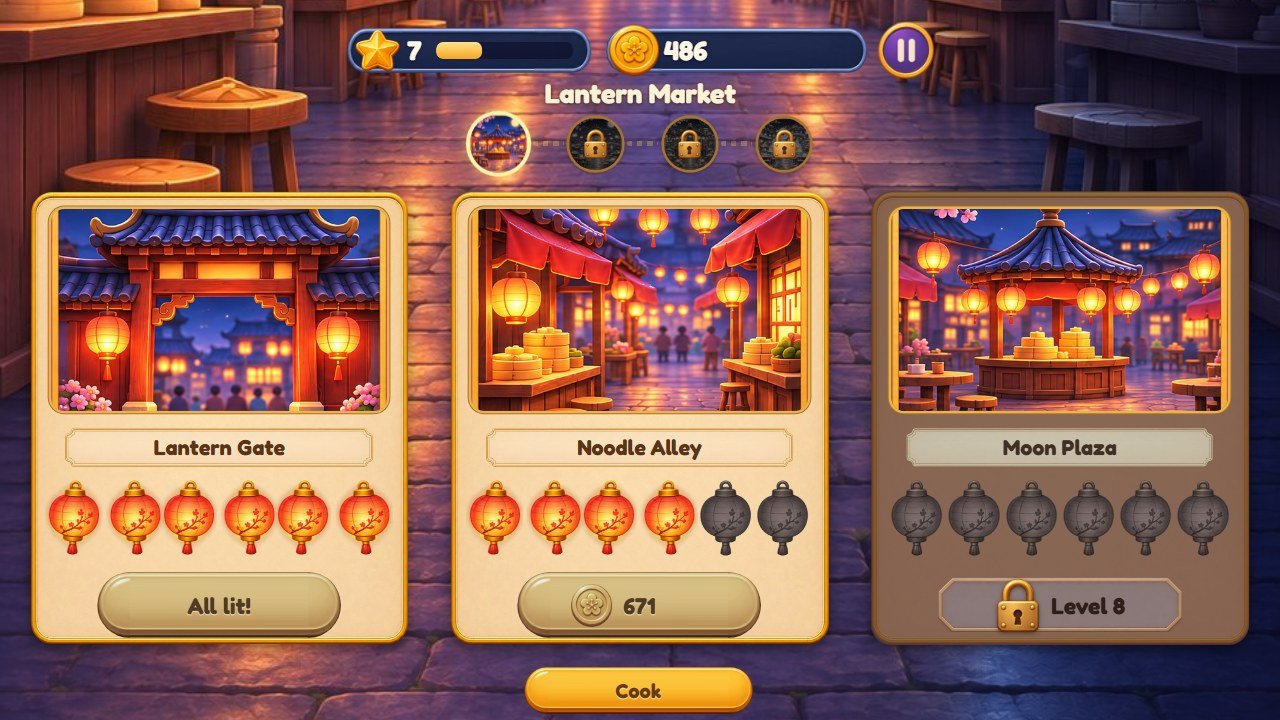 1
2
3
4
5
6
7
8
9
| # | What you see | File to change |
|---|---|---|
| 1 | District name | Text: key bairro.<id> (recipes D and E). |
| 2 | Map of the districts |
Drawn by the code from the list DISTRICTS: the picture of each one is its
area-3.png; padlock: assets/ui/lock.png.
|
| 3 | Picture of the place |
area-1.png, area-2.png, area-3.png (533×534) of the district
(recipe C).
|
| 4 | Name of the place |
Text: key area.<place>; the three places of a district are listed in
DISTRICTS.
|
| 5 | Lanterns |
assets/ui/lamp2-on.png and lamp2-off.png. There are 6 per place
(STEPS).
|
| 6 | Price of the next lantern | STEP_COST and DISTRICT_COST in src/config.js (recipe A). |
| 7 | Locked place |
assets/ui/plate-lock.png and lock.png. In the first district the places open
at the levels of AREAS; in the others, one after the other.
|
| 8 | Back to the counter | Text: key ui.kitchen. |
| 9 | Street background |
street-dark.jpg (lanterns off) and street.jpg (lit), both 941×1672, shown
turned on wide screens (recipe C).
|
A card (new level)
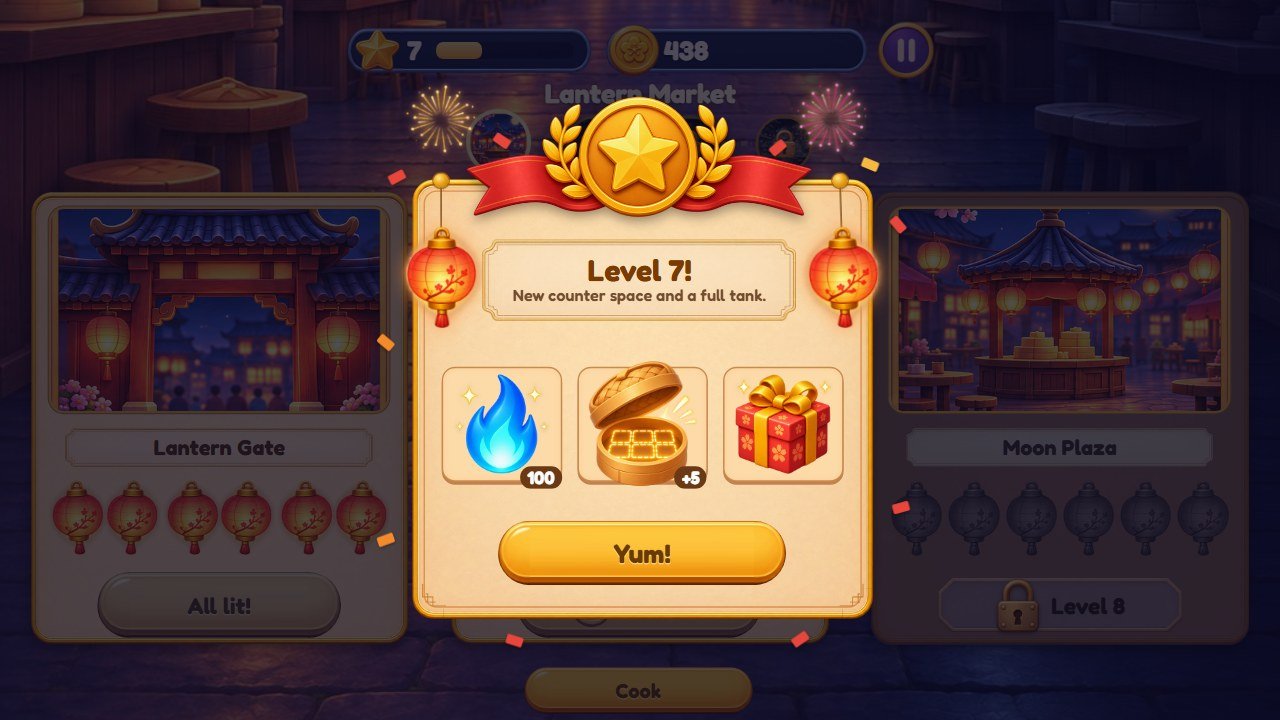 1
2
3
4
5
6
| # | What you see | File to change |
|---|---|---|
| 1 | Medal | assets/ui/medal.png. |
| 2 | Title of the card |
Texts: ui.levelUp and ui.levelUpSub. Plate picture:
assets/ui/plate.png.
|
| 3 | Hanging lantern | assets/ui/lamp2-on.png. |
| 4 | Prizes of the level |
assets/ui/prize-flame.png, steamer-open.png and prize-gift.png.
|
| 5 | Button of the card | Text: key ui.ok. Picture: the three btn-gold-*.png files. |
| 6 | Card |
assets/ui/panel-plain.png, the border greca.png, the fireworks
fogos-1.png and fogos-2.png.
|
3. More screens of the game
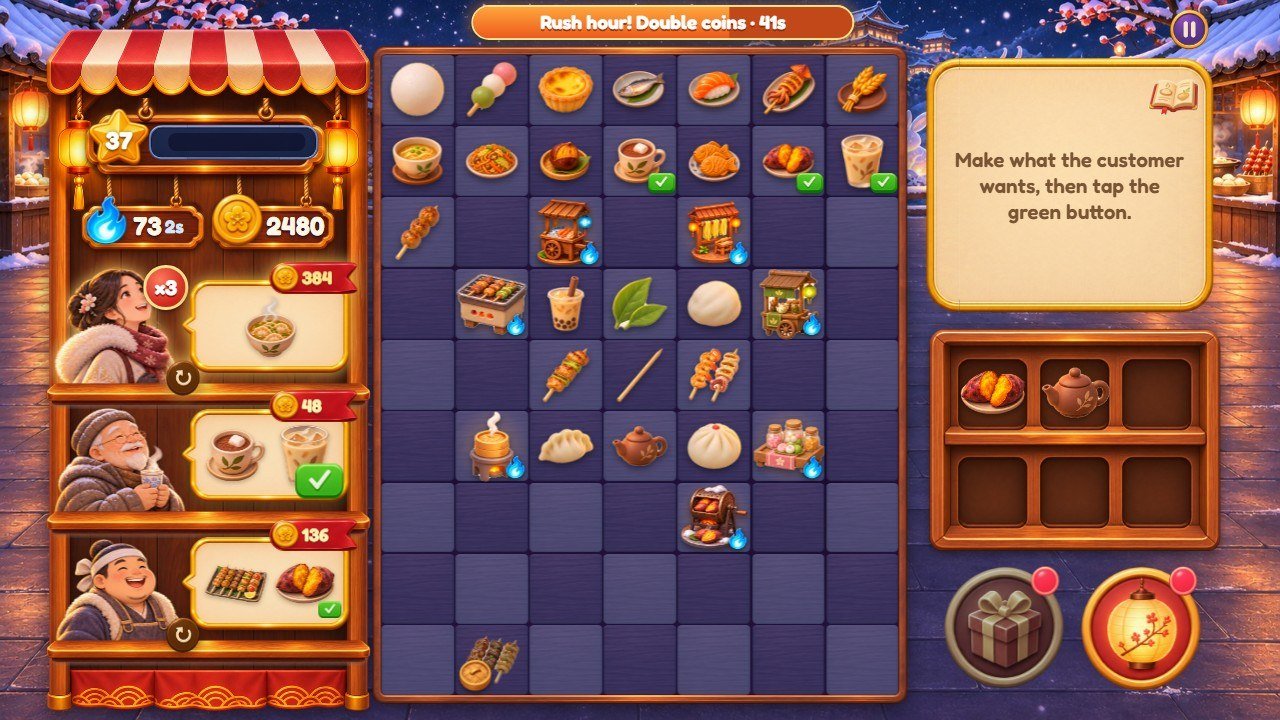
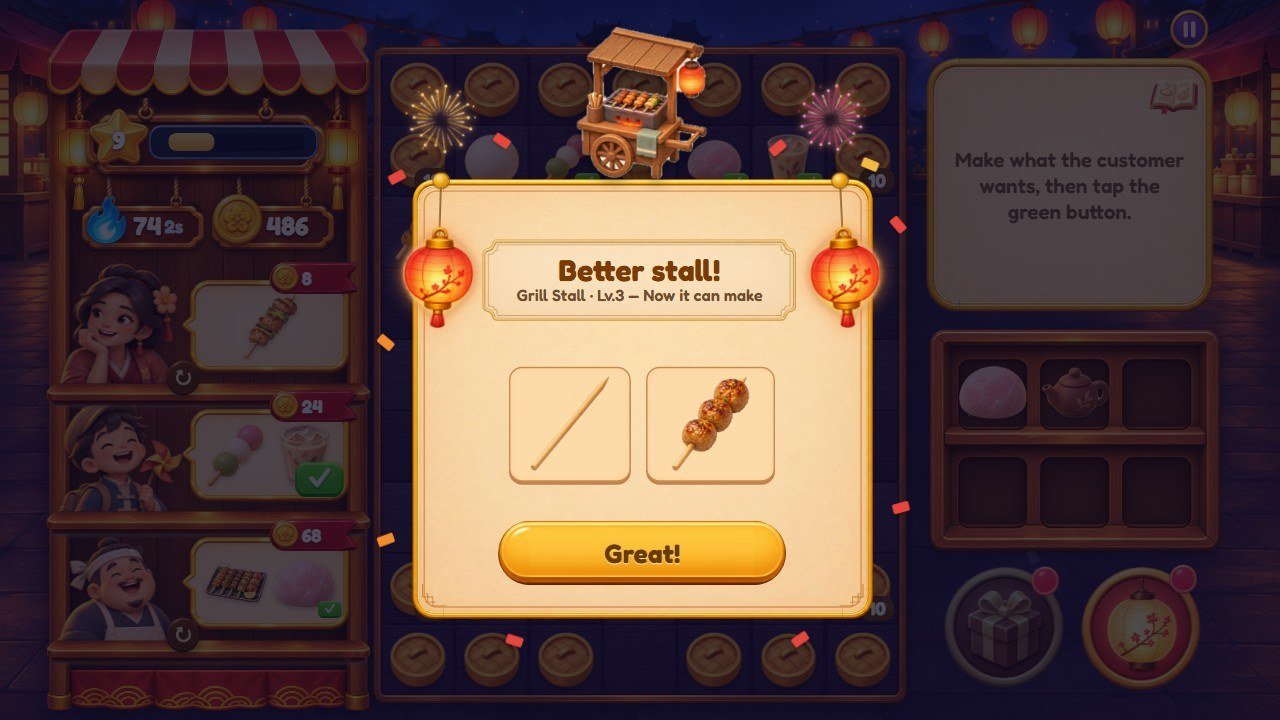
GEN_DROPS in
src/config.js).
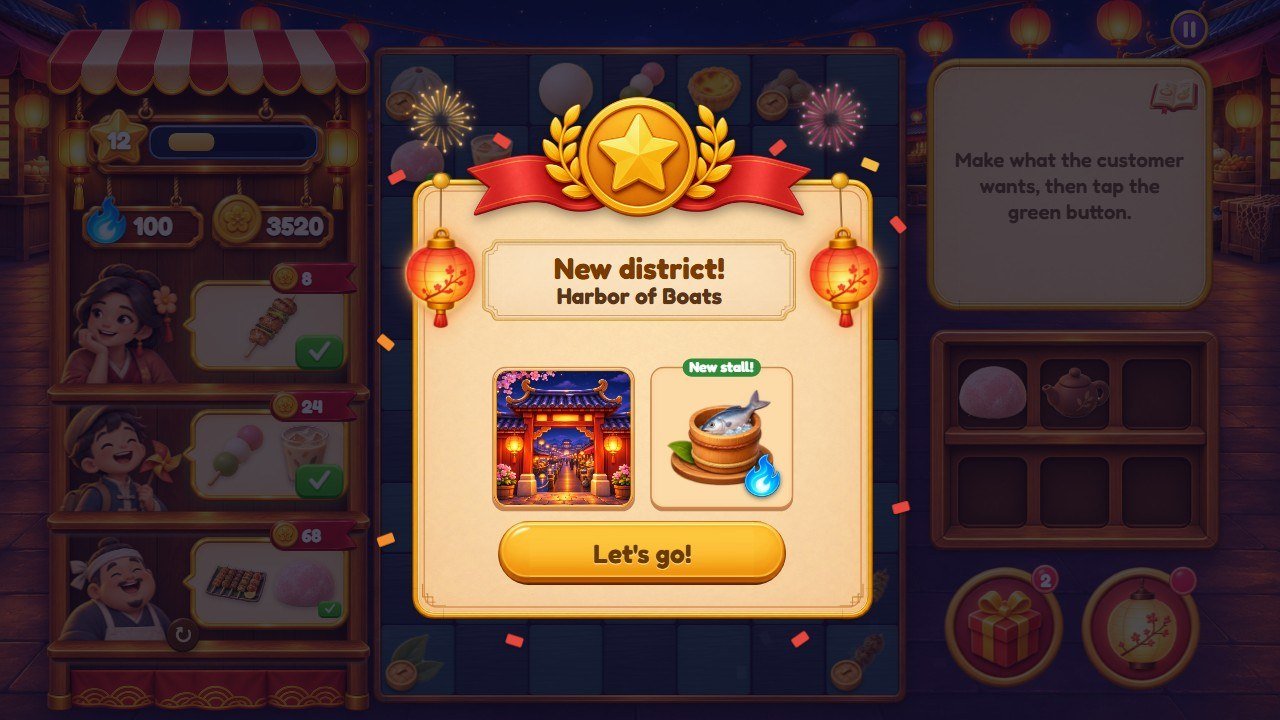
area-1.png) and its new stall.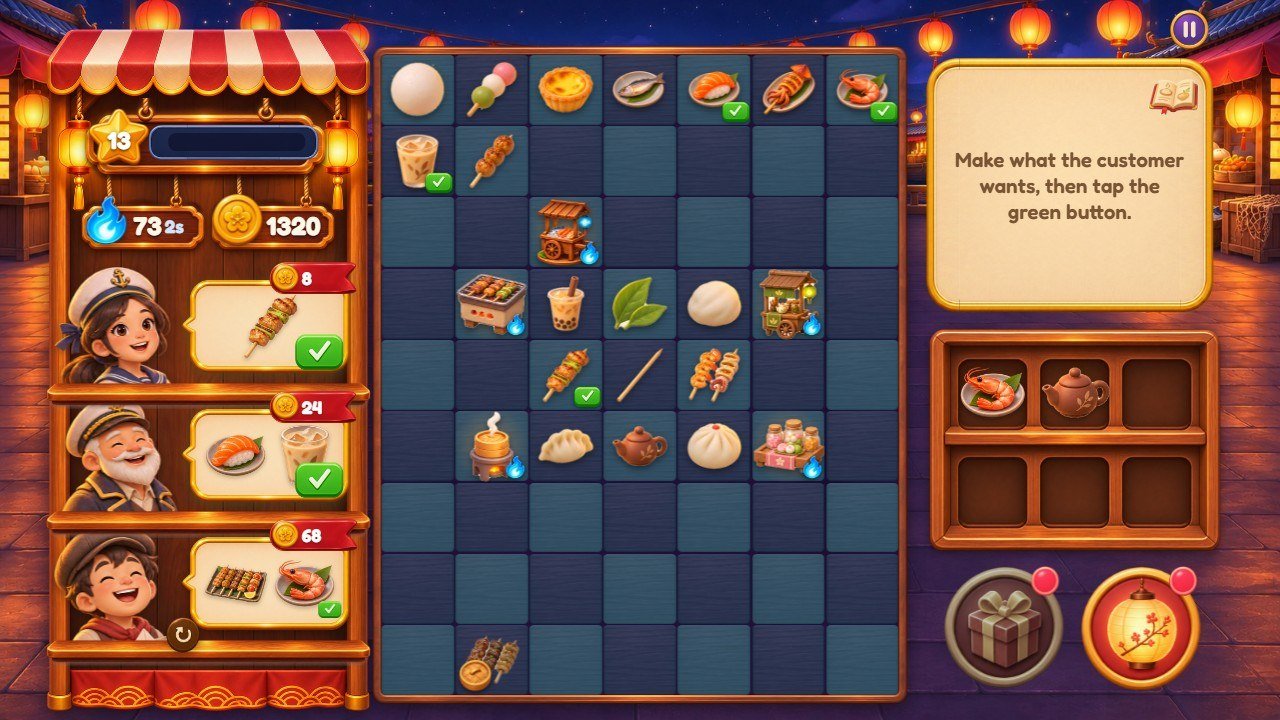
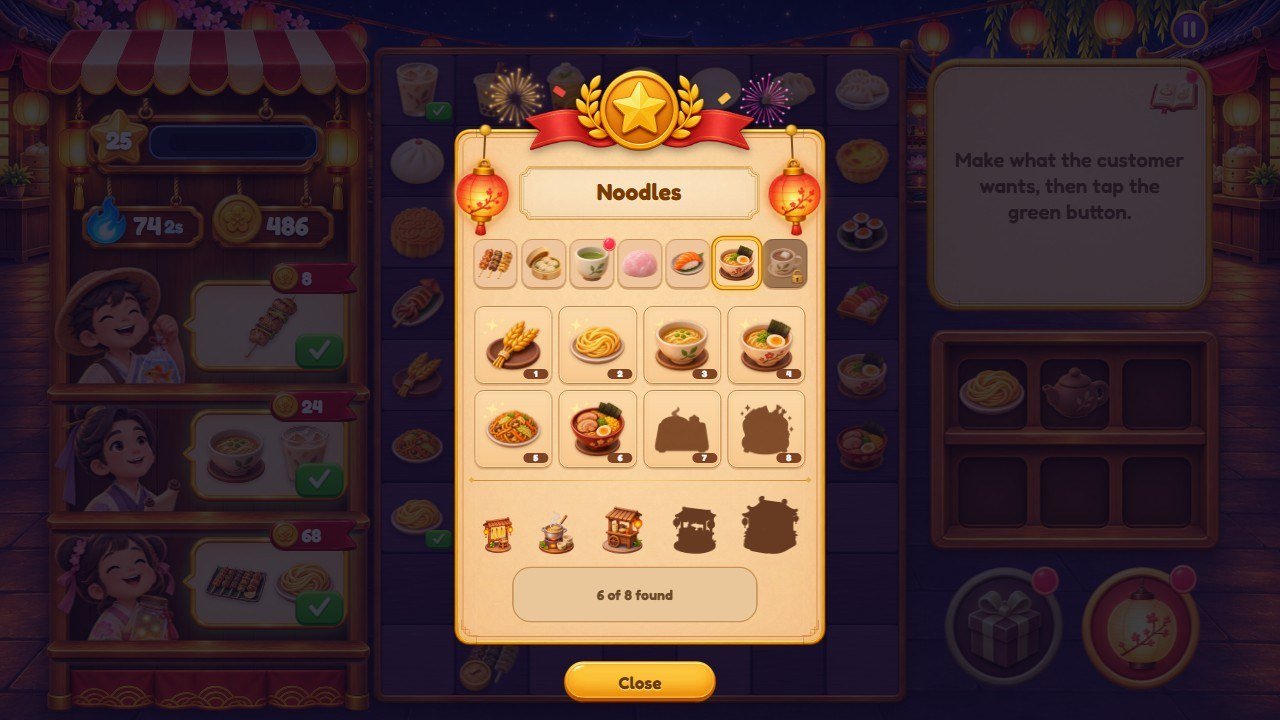
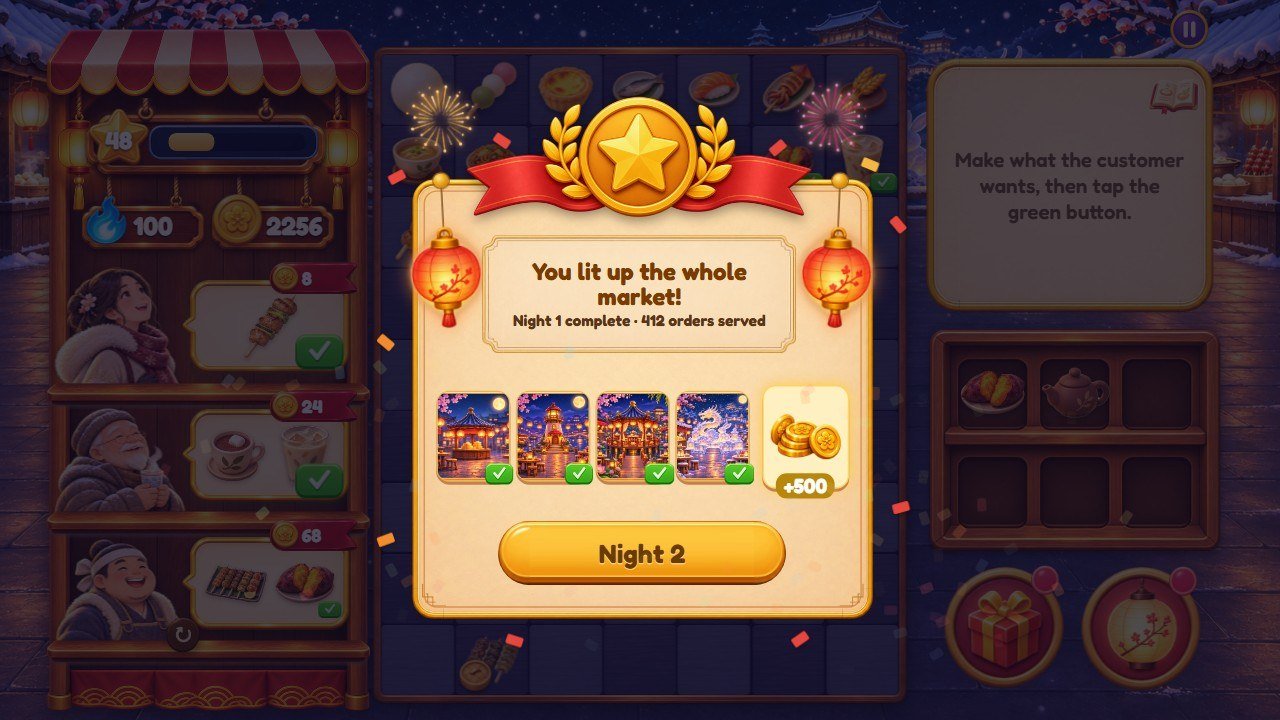
NIGHT_REWARD) and the next night.
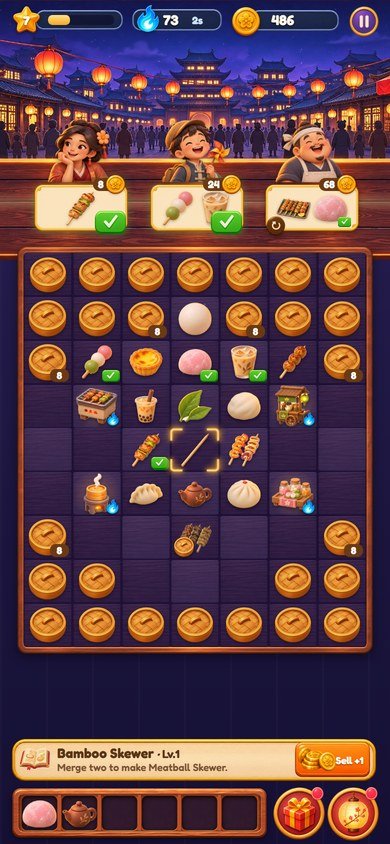
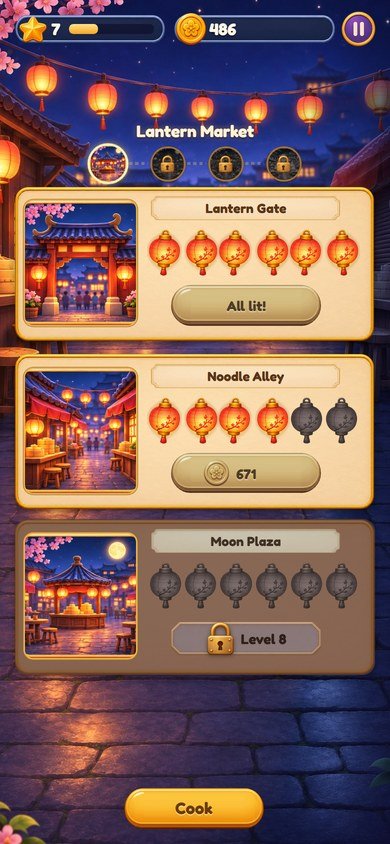
street.jpg upright).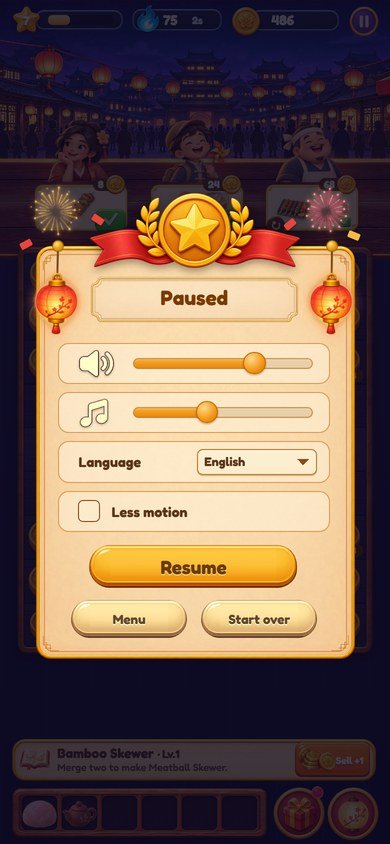
4. Recipe A: change the numbers of the game
Every number is in one file, src/config.js. Open it in the code editor, change
only the number, keep the commas and save. Each line has a short comment (in Portuguese) next to it.
| What | Name in src/config.js |
As shipped |
|---|---|---|
| Size of the flame tank | ENERGY.max |
100 |
| Time to get 1 flame back | ENERGY.regenMs (thousandths of a second) |
2000 = 2 seconds |
| Flames given back by a delivery | ENERGY.refund (part of the cost of the order) |
0.5 |
| Price of the lanterns |
STEP_COST: the first number is the price of the first lantern, the second makes each next
one dearer
|
40 and 10 (40, 50, 75, 112 … coins) |
| How much dearer each district is | DISTRICT_COST |
0.35 (35% more per district) |
| Stars per lantern, stars per level | STEP_STARS, STARS_PER_LEVEL |
2 and 3 |
| Customers at the same time | ORDERS.slots (at levels 1, 2 and 3 or more) |
1, 2, 3 |
| Dishes in one order | ORDERS.maxItems (at levels 1, 2, 3 and 4 or more) |
1, 2, 2, 3 |
| Pay of an order | ORDERS.pay |
2 |
| Free change of an order | ORDERS.swapMs |
120000 = 2 minutes |
| Special customer |
ORDERS.vipChance (0 to 1), ORDERS.vipPay, ORDERS.vipFrom (level)
|
0.12, 3, 3 |
| Rush hour |
ORDERS.rushEvery (deliveries), ORDERS.rushMs, ORDERS.rushPay,
ORDERS.rushFrom (level)
|
12, 60000 = 60 seconds, 2, 3 |
| Prize of the night | NIGHT_REWARD (multiplied by the number of the night) |
500 |
| Prize of a page of the recipe book | BOOK_REWARD |
80 |
| Level at which the Steamer and Sweets stalls arrive | at in GENS |
4 and 7 |
-
Texts that repeat a number. If you change
rushPay, also change the textui.rush("Rush hour! Double coins"). If you changevipPay, change the textsui.vipandtip.vip("pays triple") and the sealcontent: '×3'instyle-more.css(search for.who.vip::before). -
To switch something off:
vipChance: 0removes the special customer; a very largerushEvery(for example 999999) removes the rush hour. WithvipChance: 0the test of the source complains that the special customer never came (the line withvipsintest/sim.test.mjs); the game is not affected. -
The robot test. If you use
source/,npm testplays whole games with a robot and checks the pace of the game as shipped. When we tried these changes one at a time, the test still passed with a bigger tank (150), faster flames (1000), dearer lanterns (50 and 12), another prize of the night (900), another book prize, a shorter or more frequent rush hour and a special customer chance of 0.2. It failed, saying that level 5 came too early, with cheaper lanterns (20 and 5),pay: 3,vipPay: 5andrushPay: 3. That is the test doing its job: if you make the game faster on purpose, the game itself still works, and the limits to adjust are near the end oftest/sim.test.mjs(the lines with the minutes allowed to reach each level).
5. Recipe B: change the picture of a dish or a stall
-
Dishes and stalls are in
assets/items/. A dish is<chain>-1.pngto<chain>-8.png(for exampletea-1.png…tea-8.png). A stall isgen-<stall>-1.pngtogen-<stall>-5.png. - Draw your picture as a square PNG of 256×256 pixels with a transparent background, with the object filling most of the square. A bigger square also works (we tried 512×512: the game draws it in the same space), it only makes the download heavier.
- Save it with exactly the same name as the picture you replace and copy it over the old file.
-
Change the name of the dish in the list
item.<chain>(8 names, in order) and the name of the stall ingen.<stall>, in every language you use (recipe E). The name of the food on the recipe book ischain.<chain>.
6. Recipe C: change the scenery and the customers of a district
The first district (Lantern Market) keeps its pictures in assets/ui/. The others have one folder
each: assets/bairros/porto/, assets/bairros/lotus/ and
assets/bairros/neve/. Every district uses the same 13 file names:
| File | Size as shipped | Where it appears |
|---|---|---|
scene.jpg |
1914×822 | Scenery above the counter on phones held upright |
scene-land.jpg |
1672×941 | Scenery behind the counter on wide screens |
street.jpg |
941×1672 | The street with the lanterns lit |
street-dark.jpg |
941×1672 | The same street with the lanterns off (the lit one fades in over it) |
area-1.png, area-2.png, area-3.png |
533×534 |
The three places of the street; area-3.png is also the picture of the district on the map
and on the win card
|
who-1.png … who-6.png |
about 300×285, transparent background | The six customers, from the waist up |
- Prepare your pictures in the same sizes and proportions.
- Give them the same names and copy them over the old files of that district.
-
street.jpgandstreet-dark.jpgmust be the same drawing, one lit and one dark. -
The names of the district and of its places are texts:
bairro.<id>andarea.<place>(recipe E).
7. Recipe D: add a district
We tried this recipe with a fifth district called coral: the street, the map of the districts and
the win card showed the 5 districts on a phone and on a wide screen.
-
Choose a short name with no spaces or accents, for example
coral, and three names for its places, for examplereef,coveandtide. -
Open
src/config.js, findDISTRICTSand add a line at the end of the list, before the];:export const DISTRICTS = [ { id: 'market', areas: ['gate', 'alley', 'plaza'] }, { id: 'porto', areas: ['harbor', 'pier', 'lighthouse'] }, { id: 'lotus', areas: ['roundgate', 'bridge', 'pavilion'] }, { id: 'neve', areas: ['icegate', 'hotrow', 'icegarden'] }, { id: 'coral', areas: ['reef', 'cove', 'tide'] }, ]; -
Create the folder
assets/bairros/coral/with the 13 pictures of recipe C. To start, copy the folder of another district and replace the pictures one by one. - Add the music
assets/music/coral.mp3(recipe F). Without this file the district is silent. -
Open
src/locales.jsand add the four texts to the English block, next to the otherbairro.lines, and to the Portuguese block (the test of the source checks that Portuguese has every English text; the other languages show the English text until you translate it):'bairro.coral': 'Coral Bay', 'area.reef': 'Reef Gate', 'area.cove': 'Shell Cove', 'area.tide': 'Tide Market', -
Optional, the color of the counter: in
style-more.css, copy the blockbody[data-bairro='porto'](the last one in the file with that name), changeportotocoraland choose the two colors. Without it the district uses the color of the first one. -
Save, start the game and, on your computer, open
?debug&bairro=4to see the new district (the count starts at 0).
GENS (dist: 1, 2, 3) and a new food needs a
programmer (see What needs a programmer). Do not remove a district or change the order in
a game that is already online: players' saves keep the number of the district.
8. Recipe E: change texts and languages
-
English and Portuguese are in
src/locales.js(the blocksen:andpt:, and a few more lines added below them). Each of the other 12 languages has its own file insrc/locales/:es.js,fr.js,de.js,it.js,nl.js,pl.js,tr.js,ru.js,id.js,ja.js,ko.js,zh.js. -
Each line is
'key': 'text',. Change only the text between the quotes. Keep the key, the quotes and the comma. Keep words in braces such as{n}and{x}: the game puts a number or a name there. If your text has an apostrophe, write the text between double quotes, as in"Let's go!". -
Useful keys:
ui.play(title button),tut.0totut.8(the tutorial),tip.gift,tip.shelf,tip.swap,tip.book,tip.vip(tips),bairro.*andarea.*(districts and places),item.*(lists of 8 dish names),gen.*(stalls),chain.*(foods),ui.rush,ui.vip,ui.winandui.winSub(win card). - A key missing in a language shows the English text.
-
To add a language (tried with a 15th language): copy a file of
src/locales/, for examplees.jstoca.js, and translate it. Insrc/locales-more.jsadd the lineimport ca from './locales/ca.js';and addcato the list in the last line (export const MORE = { … zh, ca };). Insrc/locales.jsadd['ca', 'Català'],toLANGS. The language then appears in the pause menu and?lang=caworks. -
If you use
source/, runnpm test: it checks keys and braces in every language. After adding a language, change the number in the lineassert.equal(LANGS.length, 14);oftest/locales.test.mjsto the new count, or that test fails.
The bundled font has Latin letters only: Russian, Japanese, Korean and Chinese texts are drawn with a font of the player's device (recipe H).
9. Recipe F: replace or remove the music
-
There are 4 MP3 files in
assets/music/, one per district, played in a loop:feira.mp3(Lantern Market),porto.mp3(Harbor of Boats),lotus.mp3(Lotus Garden) andneve.mp3(Snow Festival). - Replace: copy your MP3 over a file, keeping the name. A track that loops without a gap at its end sounds best. The shipped tracks have about the same loudness; a much louder file will sound louder than the effects.
- Remove: delete a file (or the four). The game stays silent in that district and everything else works; the browser only notes the missing file in its console.
-
The music starts after the first touch (browsers require it) and players set its volume in the pause menu. The
volumes a new player starts with are
volume: 0.7, music: 0.4near the top ofsrc/game.js(0 to 1). -
Sound effects (pops, chimes, fanfares) are made by the code in
src/fx.js, so there are no effect files to replace. - Use only music you have the right to publish.
10. Recipe G: change the logo, the title screen and the icon
-
Logo: replace
assets/ui/logo.png(900×388 pixels, transparent background). It is shown on the title screen. -
Title background:
assets/ui/splash.jpg(phones held upright, 941×1672) andassets/ui/splash-land.jpg(wide screens, 1672×941). Leave room for the logo at the top and for the Play button. -
Name in the browser tab: open
index.htmland change the text inside<title>. The same file has the logo description inalt="Lantern Bites". -
Name of the installed web app:
nameandshort_nameinmanifest.webmanifest. -
Icons:
favicon.ico(browser tab),assets/icon-180.png(180×180),assets/icon-192.png(192×192) andassets/icon-512.png(512×512), square, without transparency. Replace them keeping the names. -
The girl of the tutorial is
assets/ui/guide.png(268×300, transparent) and the pointing hand isassets/ui/hand.png.
11. Recipe H: change colors and the font
-
Main colors: the first lines of
style.css:--gold(gold details),--ink(light text) and--brown(text on the cream panels). -
Color of the counter in each district: the blocks
body[data-bairro='porto'],'lotus'and'neve'instyle-more.css, with two colors each (--tAand--tB, the two squares of the checkerboard). When a name appears twice in the file, the last block is the one that counts. -
Color of the browser bar on phones:
theme-colorinindex.htmlandtheme_color/background_colorinmanifest.webmanifest. -
Buttons: the gold button is made of three pictures, the left end
(
btn-gold-l.png), the middle that stretches (btn-gold-m.png) and the right end (btn-gold-r.png). Keep the same height in the three. Panels usepanel-plain.pngand the number platespill.png. -
Sizes in the style sheets are written with
--u, the size of one pixel of the original drawing on the player's screen, so everything grows and shrinks together. -
Font: Fredoka, in
assets/fonts/(four.woff2files and the license), declared by the four@font-faceblocks at the top ofstyle.css. It has Latin and Latin Extended letters; Russian, Japanese, Korean and Chinese use a font of the device, listed after Fredoka in thefont-familyline ofbody. To use another font, add its.woff2files toassets/fonts/, change the file names in the@font-faceblocks and the nameFredokathere and inbody. Check that its license allows use in games and keep the license file with it.
12. What needs a programmer
These parts are built into the code and the layout. Changing only a number or a file is not enough:
-
A new food chain or a new stall. Besides
CHAINSandGENS, 13 pictures and the texts, the recipe book tabs insrc/game.jsand the robot test need changes. -
The size of the counter (
COLS,ROWS,UNLOCK) and the number of shelf places (SHELF): the screens are drawn for 7×9 squares and 6 places. -
More or fewer than 3 places per district or 6 lanterns per place (
AREAS,STEPS): the street is drawn for 3 cards of 6 lanterns. - More than 3 customers at the same time, or more than 6 customer pictures per district.
-
More than 8 dishes per food or 5 levels per stall (
MAX_LV,GEN_MAX). - The steps of the tutorial (their texts can be changed, their order and what they point at cannot) and the sound effects, which are made by code.
- Ads, a store, accounts, cloud saves or a ranking: this edition has none of them.
For custom work, write to willian@polargames.com.br.
13. Check and publish your changes
- Play the parts you changed on your computer (see Before you start), in a wide window and in a narrow one (F12, then Ctrl+Shift+M shows phone sizes).
-
If you edited
source/: in a terminal insidesource/, run the commands below. The first checks the rules, the pace and the texts; the second copies the game tosource/dist/.
npm test
npm run build-
Upload everything inside
game/(orsource/dist/, if you built it) to your web hosting, replacing the old files. - Open your game address and press Ctrl+F5. If you still see the old version, read the section about updates and cache in the main buyer guide.
14. If something goes wrong
-
The game does not open after you edit a file: a comma, quote or brace is missing in a
.jsfile. Press F12 and open the Console: it shows the file name and the line with the error. Compare that line with your backup. -
A picture does not appear: the file name is different from the original (names are case
sensitive:
Tea-1.PNGis nottea-1.png), or the picture is in another folder. - Nothing changed: the browser is showing the old file. Press Ctrl+F5, or open the game in a private window.
- The numbers did not change in a game already started: prices and orders already on the screen were made with the old numbers. Choose Start over in the pause menu.
- Still stuck? Restore your backup and change one thing at a time. Support: willian@polargames.com.br (include the game version, what you changed and a screenshot).